
Version Summary
Summary Description
UPM 25.2 Release introduces several enhancements to support the Partner Journey on the ZINFI Unified Partner Management (UPM) platform. These enhancements help streamline processes across the Administration, Onboarding, Enablement, Marketing, Sales, Incentive, and Acceleration phases.
Administration
- Row-Level Security (RLS) in Reports via User Roles: The UPM 25.2 update enhances the efficiency and security of embedded Power BI reports by enabling automated Row-Level Security (RLS), ensuring users only see data relevant to their roles. This update introduces a parameter selection dropdown that dynamically passes user-specific identifiers (e.g., User ID or Account ID) to Power BI, eliminating manual filtering.
- Single URL Reports for Multiple Personas: This feature allows a single Power BI report URL to dynamically display persona-specific report components, eliminating the need for multiple reports and URLs for different users, like Admins and Partners.
- Automatic Country & Language Selection Based on Browser Settings: The Automatic Country & Language Selection feature optimizes user experience by seamlessly adjusting the platform’s language and country settings based on the user’s browser preferences. If the detected language is not supported, the platform returns to the Select Country & Language page, where the user manually needs to select the country and language.
- Tracking and Applying Preferred UI Country & Language: The enhanced Country-Language Preference Tracking feature remembers a user's selected country and language across sessions, storing them in the new “Preferred UI Country” and “Preferred UI Language” fields in My Account. This eliminates the need to reselect preferences at login, streamlining access for users in multilingual, multicountry environments.
- Report Preview Functionality: This feature allows users to preview inactive reports before publishing, reducing the risk of errors and ensuring only verified, high-quality reports are shared, enhancing accuracy, confidence, and control in the reporting process.
- Save Reports as PDF / Slide – PPT: This feature enhances the report export functionality by allowing users to easily download a snapshot of the report in two of the most widely used formats – PDF and PPT. This snapshot captures the current state of the report exactly as viewed, ensuring consistency in shared or archived content.
- MDF Report Updates: The enhanced MDF Report offers interactive visuals, status summaries, and trend graphs for MDF and Claims, with role-based filters. It improves tracking and supports better, data-driven decisions for both Admins and Partners.
- Enhanced Connector Log for End-to-End Data Sync Visibility: The enhanced Connector Sync Log now provides clear, multi-level logs that are segregated and well-defined for each sync stage. This improves visibility and helps admins quickly identify and resolve integration issues with external CRMs like Salesforce or HubSpot.
- CRM Mapper Enhancement - Enable Blank Field Sync to CRMs: With the new “Send Blank Values” option in the CRM mapper, ZINFI can now push blank fields, ensuring CRMs reflect accurate and up-to-date information, including intentional data removals.
- Duplicate Mapping Validation in CRM Mapper: To enhance accuracy and prevent sync issues, ZINFI has added advanced validation in the CRM Mapper to block duplicate field mappings. If both ZINFI and CRM fields are already mapped, the system halts the setup and shows an error. If only one side is duplicated, a warning appears for admin confirmation. This ensures clean, conflict-free mappings and makes the integration setup more reliable and user-friendly.
- Display of UPM Field Labels for Easy Field Mappings: The CRM Mapper now displays actual field labels in the UPM Attribute column instead of system-generated names, making field mapping clearer and more user-friendly.
- Tooltips for CMS Editor Components: This feature enhances the CMS editor by adding helpful tooltips to key layout and content components. By clearly explaining each component’s purpose and use, it guides users, especially those less experienced, and makes page building more intuitive, efficient, and error-free.
- Collapsible CTA button: This feature streamlines the interface by letting Admins set a primary CTA button for key actions like “Add,” while secondary actions are tucked into a collapsible dropdown. It reduces clutter, highlights important tasks, and creates a cleaner, more focused user experience.
- Editing Reports - Simplified: The new feature adds a customizable edit mode to the Business Intelligence Reporting App, enabling users to tailor report layouts and visuals to their roles or client needs. By clicking the edit icon, users can access tools like the Ribbon, Report Canvas, Filters, and Visualization Panes to adjust columns, widgets, and tab configurations.
- Record-Level Log History: The Record-Level Log History feature in Workflow allows Admins to track all changes made to individual records across applications like Prospects or Contacts. It logs detailed field-level updates and ensures data accountability, with access controlled by each user's field permissions.
- Updated CAPTCHA in the Reset Password Page: The UPM platform has replaced Google reCAPTCHA with a new, custom-built CAPTCHA solution that works universally, ensuring all users can reset their passwords without facing regional restrictions.
- Enhanced Password Reset Email Instructions: Approved partners receive a welcome email with a password reset link valid for 24 hours. Delays in checking or receiving the email can cause the link to expire. To reduce issues, the email now clearly explains the time limit and guides users to request a new link if needed.
- Prospect-to-Account Mapping in Dynamic Forms: This feature simplifies partner registration by automatically matching prospect details (like email or company name) to existing accounts. It auto-fills information when a match is found, reducing manual work and errors. If no match exists, the prospect is saved separately, ensuring no data is lost. This improves accuracy, speeds up engagement, and enhances the user experience.
- Dynamic Forms - Enhanced Conditional Field Display Logic: Previously, field visibility could be triggered by only one value. Now, Admins can set rules based on multiple values for a single field—e.g., “If Country = USA OR Albania, then show State or City.” This enhanced logic allows flexible configurations using dropdown options controlled from the backend. Fields can dynamically show or hide based on inputs like country, partner type, or business unit, streamlining form behavior and data collection.
- “Auto Populate By” – Primary Field Mapping and Validation in Dynamic Forms: This feature adds a new “Auto Populate By” setting, letting admins choose one primary field (e.g., Company Name, Partner Number, or Email) for account validation. When filled, the system checks for a match and auto-fills related fields like Country or City. It enhances form flexibility, improves data accuracy, and streamlines the user experience.
- Enhanced Search & Filter Functionality: The new Filter button combines both Basic and Advanced search, showing only relevant fields like “Badge Name.” Filter results appear instantly, and a clear (×) icon allows quick reset. Advanced search features remain unchanged, offering a more streamlined and user-friendly interface.
- Single URL-based Reports for Multiple Personas: The Reporting Engine now supports dynamic Power BI reports that adapt based on user personas (e.g., Admin, Partner). Instead of maintaining separate URLs for each role, a single report link now displays personalized content based on who is viewing it, reducing redundancy and simplifying management.
- Updated Verbiage in Login UI: The update simplifies terminology and improves messaging for better clarity and consistency. Revised labels and instructions enhance user understanding, reducing confusion and streamlining the experience.
Incentivize
- Incentive Rules Engine Upgrades - Auto-entitlement: This enhanced feature offers greater flexibility in managing MDF by allowing businesses to create incentives without predefined targets. Partners can now earn based on past sales achievements, enabling a dynamic, performance-based model. A new "Enable Target-Based Incentive" field lets users specify if targets are required, while the Incentive Structure field supports Fixed (set periodic payouts) and Variable (percentage-based rewards) modes.
- Incentive Rules Engine – Import Engine Integration: This feature enhances the Incentive Rules Engine by integrating it with the UPM Import Engine, allowing users to bulk import Incentive Rules using a standard XLSX format. With a downloadable sample worksheet and field-mapping support, users can easily configure and perform insert or update operations in bulk.
Sell
- Records in "Pending More Info" Status – Deletion Restricted: This new feature prevents deletion of Deal records in "Pending More Info" status, ensuring data is preserved during review and avoiding miscommunication or workflow disruption. It enhances data integrity and streamlines the approval process by blocking premature deletions.
- Record-Attached Files Downloadable in ZIP: This feature enables users to conveniently download all attachments, such as documents, PDFs, and multiple product images related to a record in any UPM application in a single ZIP file. Eliminating the need to download files individually streamlines the process and significantly reduces manual effort, boosting overall productivity.
- Lead Assignment Rule Engine: This feature lets Admins automate lead distribution based on criteria like country, state, or lead source. With easy setup and permission control, it ensures leads reach the right users or teams quickly, boosting efficiency and minimizing missed follow-ups.
Enable
- Dedicated Download Option for Co-Branded Assets for Partners: This enhancement adds a Download button to the listing page, allowing partners to access co-branded assets without opening the details page. Available in List View and via the four-dot menu in Card View, it simplifies navigation and streamlines asset management.
- Progress Bar in Card View and Thumb View for Enrolled Courses and Certificates: The new progress bar in card and thumbnail views lets users instantly see their real-time course or certificate completion percentage without opening each item. It visually shows progress - from 0% to 100% - making it easier to track learning status at a glance and stay engaged.
- Default Completion Messages (Pass/Fail) for Learning Assessment: Previously, if a partner’s assessment score didn’t match any predefined range, a generic message was shown, even if it didn’t reflect their performance. The new update introduces default success and failure messages, ensuring users always receive accurate, personalized feedback based on their actual score. This enhances clarity and creates a more professional learning experience.
- Dynamic Labels based on Training Material Progress: This fix improves user clarity by updating the section button label based on training progress: “Start” if nothing is completed, “Resume” if partially done, and “Review” when finished. This real-time labeling makes navigation clearer and enhances the learning experience.
- Co-Branding Default Logo Logic - Enhancements: Co-branding is now simpler. We've replaced the "Default OEM Logo" checkbox with a clearer "Default Partner Logo" option in Asset settings, visible only when enabled. The system now prioritizes logos from the Partner Logo module, then My Account, or allows selection via a simplified pop-up if no default is set. We've also removed the "High Resolution Logo" field, making the process more intuitive for everyone.
Onboard
- Display Program Type Assignment in Partner Program Sessions List Page: The addition of the Program Assignment Type field on the View My Programs page improves clarity by specifying whether a Program is assigned at the Contact level or Account level. This clear distinction allows both admins and partners to better understand whether progress and benefits are tracked individually or shared across an account, minimizing confusion and enhancing overall program management.
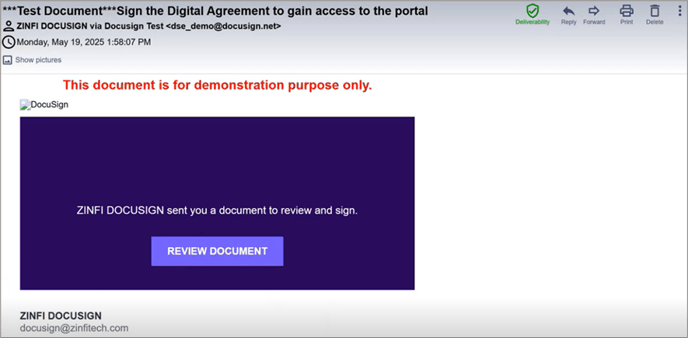
- Contracts Agreement Hub: The Agreement Hub in UPM streamlines partner onboarding by requiring agreement acceptance before portal access. OEMs can set up customizable digital (DocuSign) or non-digital templates to ensure terms are acknowledged securely. With signature tracking, role-based access, and automated verification, it boosts compliance, speeds up onboarding, and reduces unauthorized access risks.
ZINFI 6 S’s of CX Strategy
Security
Stability
Scalability
Speed
Simplicity
Sufficiency
UPM 25.2 Features
Row-Level Security (RLS) in Reports via User Roles
Related Module(s)
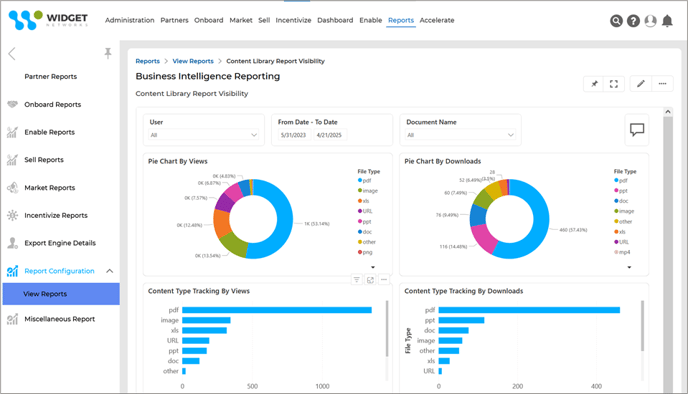
Business Intelligence Reports
Feature Description
The new enhancement in UPM 25.2 significantly improves the efficiency and security of embedded reports by enabling automated Row-Level Security (RLS) in Power BI. With this update, reports can dynamically filter data based on the logged-in user's role, ensuring that each user only sees the data relevant to them. By introducing a dedicated parameter selection dropdown, the system now automatically sends user-specific identifiers (such as User ID or Account ID) to Power BI, eliminating the need for manual filtering. This enhancement enhances data security by preventing unauthorized data access and reduces administrative overhead by streamlining report configurations.
Row-Level Security (RLS) in Power BI allows for dynamic data filtering based on user roles, ensuring that individuals only see relevant information. This is achieved by defining roles with DAX expressions that filter data based on parameters, which can be passed from external sources or embedded applications. The process begins in Power BI Desktop, where parameters are defined in the Power Query Editor. These parameters are then referenced in queries to filter data dynamically. Subsequently, roles are created in the Modeling tab, and RLS rules are defined using DAX expressions that incorporate these parameters, allowing for role-based filtering.
When embedding Power BI reports, parameters can be passed through embed tokens containing user-identifying strings. The user's ID or other relevant data can be passed as a parameter to the Power BI report, and this parameter value is then used in DAX expressions to filter data based on the user's role or criteria.
- Navigate to the Report Zone by selecting Enable from the top menu.
- After completing the initial steps, such as adding the Report Environment and Configuring the Report, the user reaches the Report Visibility
- Row-Level Security via Roles: Upon reaching the Report Visibility section, the user will configure visibility through Power BI RLS (Row Level Security). Visibility will be role-based. A report can be configured with multiple role-based visibility.
- Admin: Grants visibility to all admin-internal and partner accounts’ data.
- Partner Admin: The Partner Admin will see only his/her account's data.
- Partner: Limits visibility to the partner’s own data.
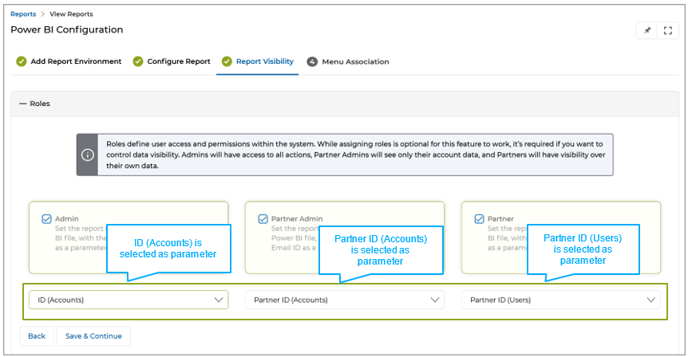
- Automated Parameter Transfer: Instead of relying on manual filtering or complex configurations, the system now automatically sends user identifiers (e.g., User ID, Account ID) as parameters to Power BI. This automation is crucial for dynamic RLS, where data visibility changes based on the logged-in user. A new dropdown menu in the Report Visibility section enables administrators to select the specific parameters to be sent to Power BI. This selection determines the filtering criteria for RLS, making the configuration process more intuitive and flexible.
This dropdown allows the report embedder to select the fields (e.g., Partner ID, Account ID) to send as parameters to the embedded service, i.e., Power BI.
-
- The parameter dynamically filters the data displayed in the embedded report based on the user's role and associated data.
- The drop-down box allows the user to configure the report to select a field to be sent as a parameter.
- The fields available in the drop-down are populated from the Partner Accounts and Users applications.
- The embedder of the report uses the parameter to implement RLS (Row Level Security) in the embedded report service i.e. Power BI, ensuring that users only see data relevant to their role or permissions.
- Once done, click the Save & Continue button to take us to the Report Menu Association
Origin of Feature
Customer request. The feature is designed to implement parameter-sending enhancement in UPM and enable automated Row-Level Security (RLS) in the Power BI Report.
CX Strategy Relation (6 S’s)
Scalability
Portal User-Facing Benefits
The feature allows admins to configure parameter-sending enhancement in UPM.
______________________________________________________________________________________
Incentive Rules Engine Upgrades - Auto-entitlement
Related Application(s)
Market Development Funds Management, Commissions Management, Rebates Management
Feature Description
The Enhancement in the Incentive Rules Engine introduces greater flexibility in managing MDF/Commission/Rebate rules by allowing organizations to create incentive programs without setting predefined partner targets. Previously, incentive rules required targets to be assigned for partners to qualify for earnings. With this enhancement, businesses can now configure incentive rules where partners accrue funds based on past sales achievements without mandatory targets: this benefits mid-market and enterprise customers who prefer a dynamic, performance-based model.
A new "Enable Target-Based Incentive" field has been introduced, allowing users to define whether an incentive rule requires targets. Furthermore, the Incentive Structure field now offers two modes - Fixed (where a set amount is awarded periodically) and Variable (where incentives are calculated based on a percentage of sales for each period). These enhancements give organizations greater customization and adaptability in structuring their partner incentive programs.
Example Use Case
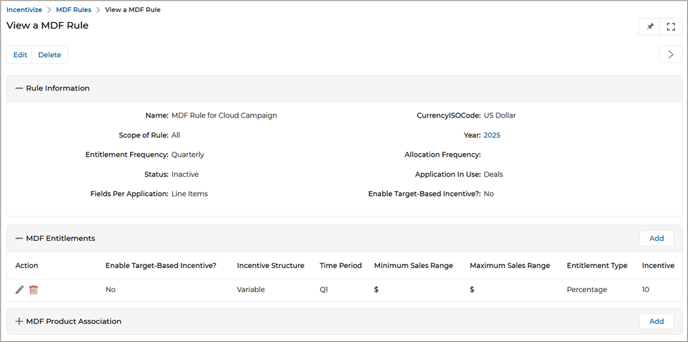
- Navigate to Incentivize > Incentive Rule Engine > MDF Rules to reach the View MDF Rules page listing all the MDF Rules.

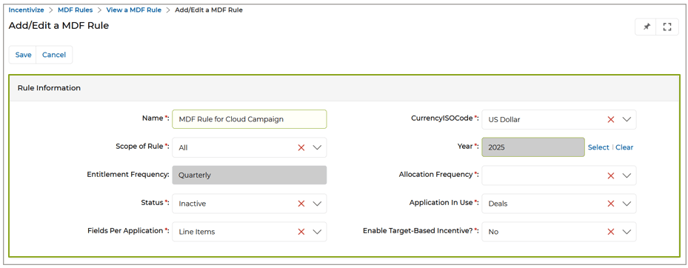
- To add a new MDF Rule, click the Add button. This will take us to the Add/Edit an MDF Rule Engine page, where we’ll select the frequency of the incentive payout to Partners from the Entitlement Frequency dropdown menu, which is Quarterly in this example.
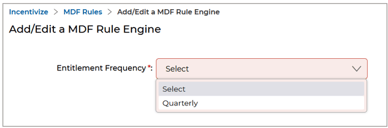
- Selection of Entitlement Frequency will take us to the Add/Edit a MDF Rule page, where we must provide the necessary information in the Rule Information section to create the new MDF Rule. The fields are described below:
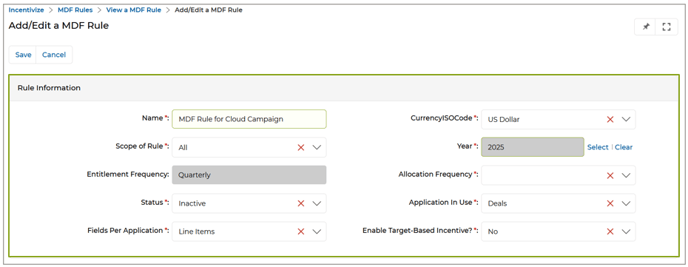
- Name – Provide the name of the MDF Rule.
- Currency ISO Code – Choose the desired currency from the dropdown list.
- Scope of Rule—This dropdown list has three options: Partner Tier, Partner Account, and All. If a Partner Tier is selected, the Rule will apply to the Accounts with that Partner Tier. Select Partner Account to apply the Rule to a specific Partner Account. Selecting All will apply the Rule to all Accounts.
- Year – Select the year for which the MDF Rule is applicable.
- Entitlement Frequency – This field's value shows the incentive payout frequency.
- Allocation Frequency – The period partners must meet their targets to qualify for incentives.
- Status – It could be either Active or Inactive.
- Application In Use – The Partner can earn an incentive on Deal closure or Invoice generation. Select either Deal or Invoice as per requirement.
- Enable Target-Based Incentive? – Selecting a value will determine whether a rule requires a target.
- If the value is set to "No" - the incentive will be accrued automatically based on sales without a set target.
- If the value is set to "Yes" - a specific target must be met to earn incentives.
Note: Targets can be set in the MDF Entitlements list. For more information, please visit the “Market Development Funds Management - CMM” guidebook (pages 29 – 30).
- Once done, click Save. The newly created Rule will be visible in the View MDF Rules page.
- Once we go to the details page of the newly created MDF Rule, we have to define MDF Entitlement rules by clicking the Add button associated with MDF Entitlements.
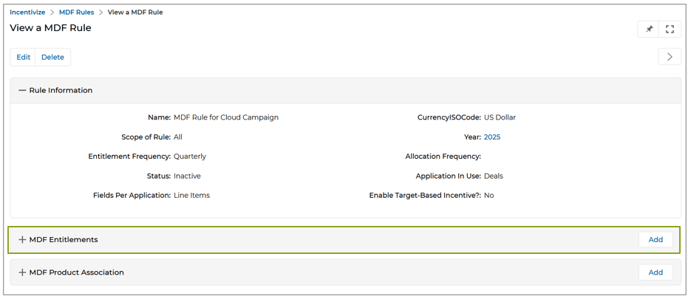
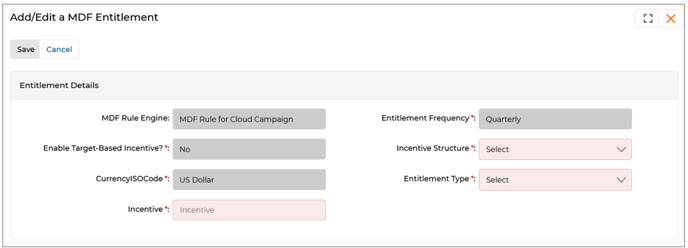
- Clicking the Add button takes us to the Add/Edit an MDF Entitlement page, where we’ve to provide Entitlement Details. The fields are explained below:
-
- MDF Rule Engine – Name of the MDF Rule associated with the MDF Entitlement.
- Entitlement Frequency – Shows the Entitlement Frequency already selected beforehand.
- Enable Target-Based Incentive? Shows whether incentives will be paid out for achieving specific targets.
- Incentive Structure—The Incentive Structure field determines how the incentive amount is allocated to partners. Based on their needs, businesses can choose between a fixed or variable incentive model.
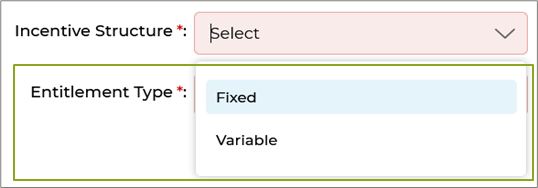
If the value is selected as Fixed, then the partner receives either a predefined, constant amount for each entitlement period (e.g., quarterly or monthly), or, a specific percentage of the total amount of Deal closure or Invoice generation for each entitlement period (e.g., quarterly or monthly).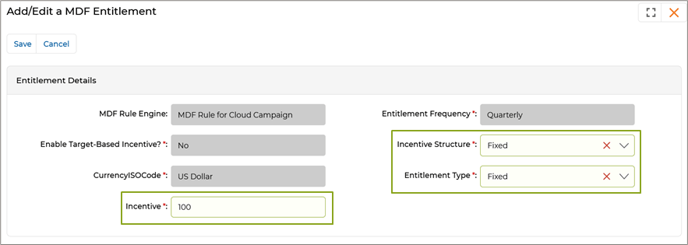
If the value is selected as Variable, different percentages of incentive amount can be applied based on business requirements entitlement period i.e. monthly or quarterly.
-
- CurrencyISOCode – Currency of the incentive.
- Entitlement Type – Entitlement Type will be either Fixed or Percentage.
- Incentive – Provide the amount or the percentage in this field.
- Click Save once done. The MDF Entitlement will be visible in the MDF Entitlements related list.
- When the Incentive field is configured e.g. Deal closure within the MDF Entitlement setup, the system dynamically calculates the incentive amount based on actual sales performance achieved by partners. If the Entitlement Type is set to Fixed, partners receive a consistent, predefined amount for each entitlement period upon successful deal closure. Conversely, if set to Percentage, the incentive is proportionally derived from the total deal value, rewarding partners directly in alignment with their sales efforts. This ensures that incentive payouts are not only timely but also performance-driven, empowering partners to focus on tangible business outcomes while giving organizations the flexibility to align rewards with strategic goals.
Origin of Feature
Customer request. This feature allows Admins to configure incentive rules without setting any mandatory targets.
CX Strategy Relation (6 S’s)
![]()
Portal User-Facing Benefits
This feature allows Admins to configure incentive rules for Partners without setting any mandatory targets.
______________________________________________________________________________________
Automatic Country & Language Selection based on Browser Settings
Related Application(s)
Users & Territories Management
Feature Description
The Automatic Country & Language Selection feature auto-configures the platform’s language and country settings based on the user’s browser’s country and language preferences. When a user accesses UPM for the first time, it detects and applies the browser’s applied language and country settings, without requiring manual intervention. If the detected language is not supported by the platform, the platform redirects to the “Select Country & Language page”. Users can also manually override automated country-language selection from the “Select Country & Language page”.
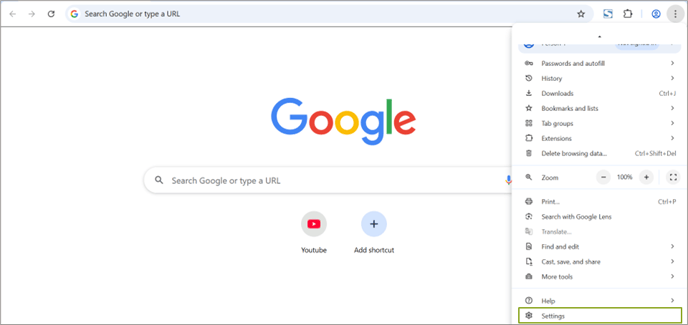
- Open the UPM portal in a browser e.g. Google Chrome.
- We observe that on the pre-log in page, country and language have been selected as USA and English, respectively.

- Open Chrome and click on the three-dot menu (top-right corner).
- Go to Settings and scroll down, and click Languages.
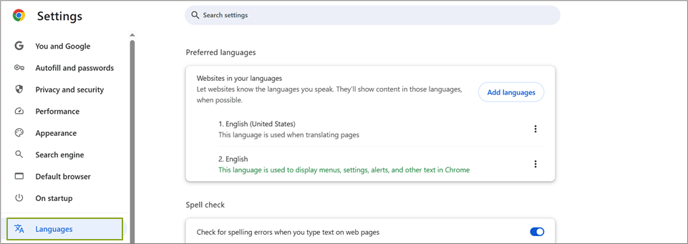
- We see that the language is selected as English (United States).
- Click Add Languages, select a language other than English, e.g., German (Germany), move it to the top, and refresh the page for the changes to take effect.
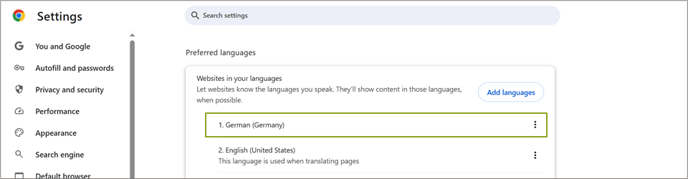
- Now, go back to the UPM screen and refresh the page. The new Country-Language selection (Germany-German) will be visible on the pre-login page.

- If the browser's selected language and country do not match any available options on the UPM Select Country & Language page, the user will be redirected to the Select Country & Language page on the UPM, where they need to select the country and language manually.
- If only one of them (country or language) is mismatched, the user will still be redirected to the Select Country & Language page for manual selection.
Origin of Feature
Customer request. This feature automatically selects the country and language in UPM based on the browser’s country and language settings.
CX Strategy Relation (6 S’s)
![]()
Portal User-Facing Benefits
This feature selects the country and language in UPM based on the browser’s country and language settings.
______________________________________________________________________________________
Records in "Pending More Info" Status – Deletion Restricted
Related Application(s)
Deals Registration Management
Feature Description
This new feature restricts deletion when a submitted record is in the "Pending More Info" status and ensures that critical data and context are preserved for both partners and admins, reducing the risk of miscommunication, loss of audit trails, or broken approval cycles. The primary advantage of this feature is that it enhances data integrity and streamlines the approval workflow by preventing accidental or premature deletion of records that are still under review and awaiting additional information.
Example Use Case
- Once a Deal is submitted by the Partner for approval, the Admin has the option to request additional information instead of directly approving or rejecting the request.
- To do this, the Admin navigates to the Deal’s details page, clicks on “More Info,” and requests more information instead of selecting “Approve” or “Reject.” The Deal's status then updates from “Pending Approval” to “Pending More Info.”
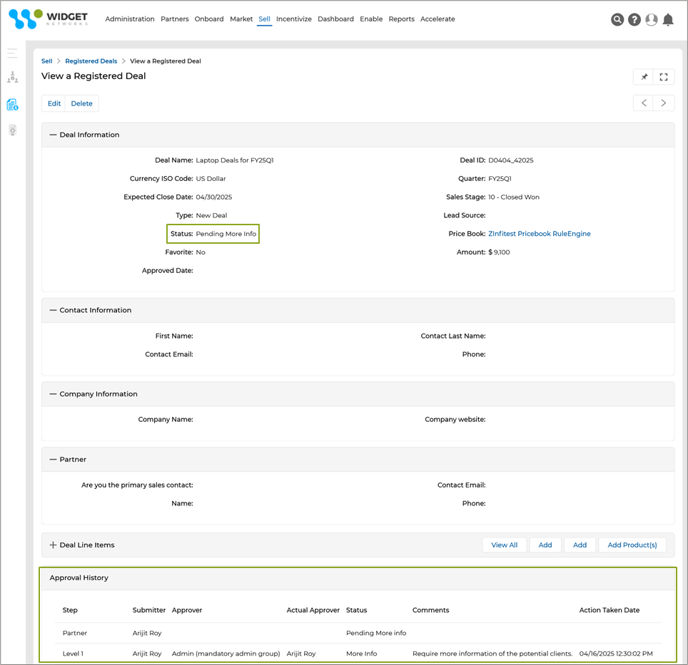
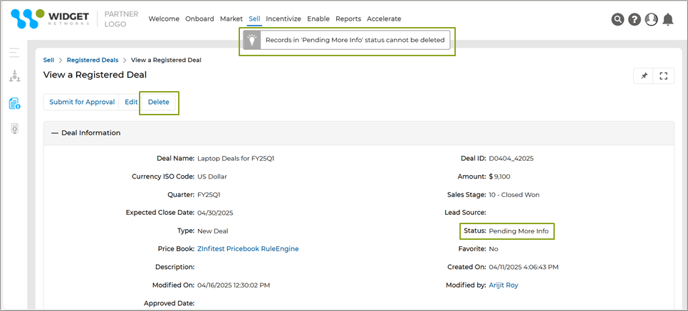
- If the Admin attempts to delete a Deal in “Pending More Info” status, a validation message appears stating: "Records in Pending More Info status cannot be deleted" This prevents the record from being deleted during the ongoing review.
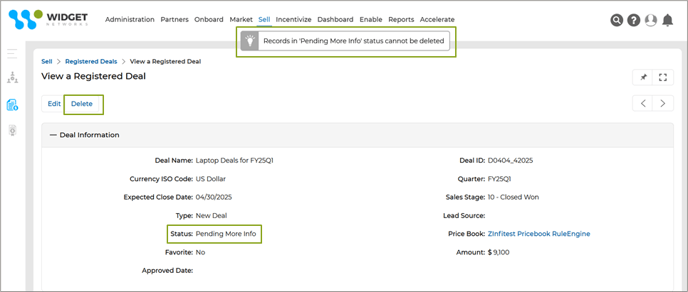
- Likewise, the Partner is also restricted from deleting any Deal record in “Pending More Info” status.
Origin of Feature
Customer request. This feature prevents Deal records from getting deleted while in “Pending More Info” status.
CX Strategy Relation (6 S’s)
![]()
Portal User-Facing Benefits
This feature restricts Admins and Partners from deleting Deal records while in “Pending More Info” status.
______________________________________________________________________________________
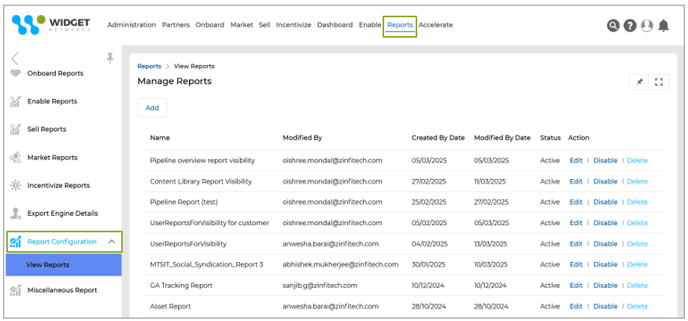
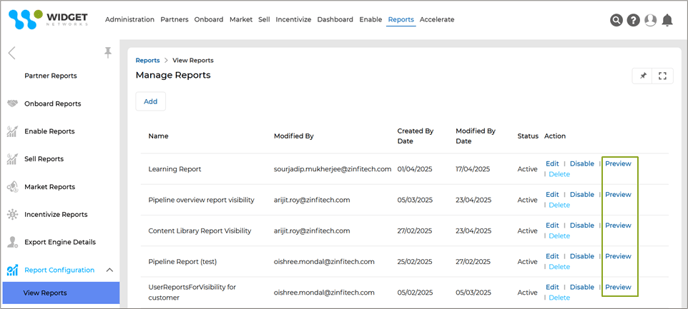
Report Preview Functionality
Related Application(s)
Business Intelligence Reports
Feature Description
Introducing the Report Preview functionality in the Report Configuration application significantly enhances user experience and operational efficiency. This feature adds a vital layer of validation and quality assurance to the reporting workflow by enabling users to preview reports even when they are inactive before publishing them. It eliminates the guesswork and potential risk of publishing misconfigured or incomplete reports, empowering OEM Admins and Partners with greater confidence and control. This simple yet impactful addition streamlines the report creation process, reinforces best practices, and ensures that only fully verified reports are shared with end users, ultimately driving higher satisfaction and trust in the platform.
- Navigate to Report Zone > Report Configuration > View Reports to reach the Manage Reports page, where all the Reports are listed.

- Clicking “Preview” associated with any of the Reports will take us to the actual report page, displaying the content as it would appear when published.
- This allows validation of the layout, data, and overall configuration before publishing the report.
Origin of Feature
Customer request. This feature provides the option to preview reports before they are published.
CX Strategy Relation (6 S’s)
![]()
Portal User-Facing Benefits
This feature enables Admins to preview Reports before publishing them.
______________________________________________________________________________________
Save Reports as PDF / Slide – PPT
Related Application(s)
Business Intelligence Reports
Feature Description
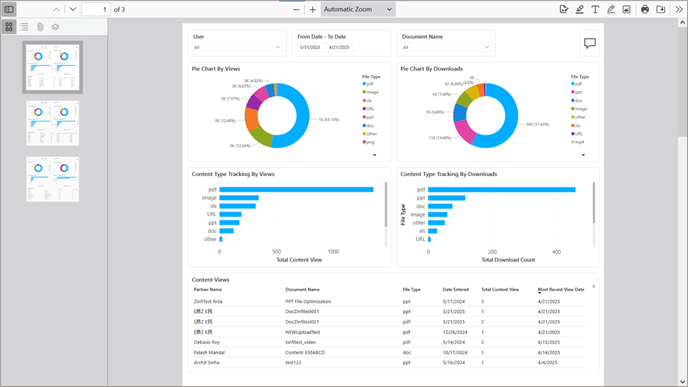
The newly introduced "Save as PDF" and "Save as Slide/PPT" features enhance the report export functionality by allowing users to easily download a snapshot of the report in two of the most widely used formats – PDF and PPT. This snapshot captures the current state of the report exactly as viewed, ensuring consistency in shared or archived content.
- Navigate to Report Zone > Report Configuration > View Reports to reach the Manage Reports page, where all the Reports are listed.
- Clicking “Preview” associated with any of the Reports will take us to the actual report page, displaying the content as it would appear when published.
- At the top-right corner of the page, hover your mouse over the four-dot icon to reveal export options. From the menu that appears, choose the preferred format – Save as PDF or Save as PPT, based on the requirement.
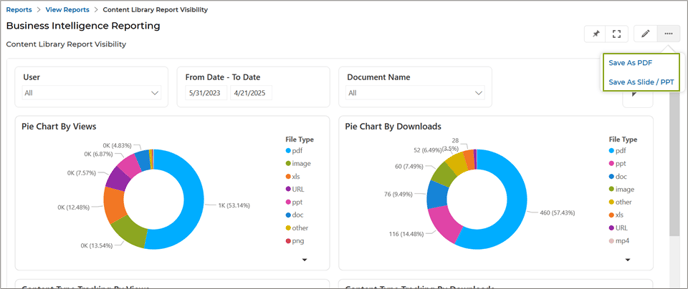
- Click on the preferred option, the Report will be instantly exported in PDF or PPT based on the selected format.
- PDF:
- PPT:
Origin of Feature
Customer request. This feature provides the option to export and download Reports in PDF/PPT.
CX Strategy Relation (6 S’s)
![]()
Portal User-Facing Benefits
This feature enables Admins and Partners to export and download Reports in PDF/PPT.
______________________________________________________________________________________
Record-Attached Files Downloadable in ZIP
Related Application(s)
Partner Leads Management
Feature Description
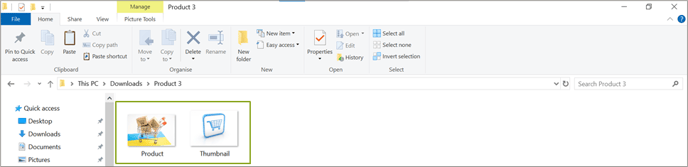
This feature allows users to effortlessly download all attachments, such as documents, PDFs, and multiple product images in a single ZIP file, associated with a record in any UPM application. This functionality enhances productivity by eliminating the need to download each file individually, significantly reducing manual effort.
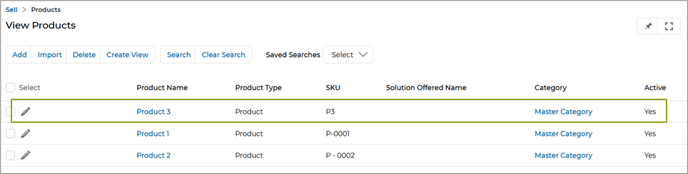
- Navigate to Sell > Leads > Products to access the Manage Products page, where all listed Products are displayed.
- Click on the Product Name to open the Product Details page, where all associated attachments, such as the Product and Thumbnail images, are visible.
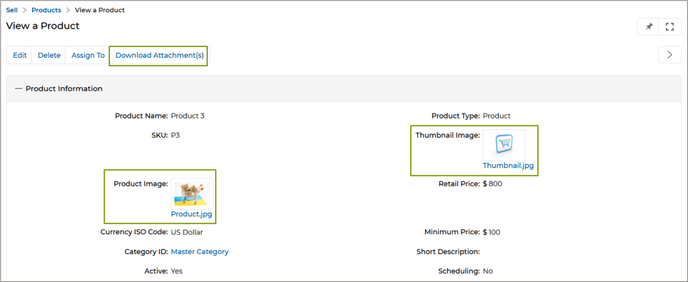
- Click the Download Attachment(s) button to initiate the download of all attached files linked to the product record in a single ZIP folder.
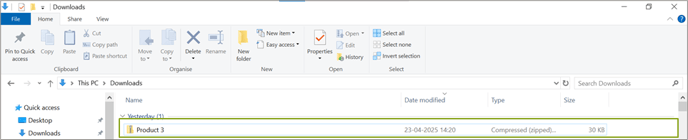
- After downloading, extract the ZIP folder to view all the attached files.
Origin of Feature
This feature, which was requested by the customer, allows you to download all attached files associated with a Product record in a single ZIP folder.
CX Strategy Relation (6 S’s)
Sufficiency
Portal User-Facing Benefits
This feature enables Admins to download all attached files associated with a Product record in a single ZIP folder.
______________________________________________________________________________________
Tracking and Applying Preferred UI Country & Language
Related Application(s)
Users & Territories Management
Feature Description
The enhanced Country-Language Preference Tracking feature ensures a personalized and consistent user experience by automatically remembering a user's selected country and language preferences across sessions. Once a user selects a country-language combination on the login page, the system stores these preferences on the server and displays them in the My Account section under the newly added fields – Preferred UI Country and Preferred UI Language.
These preferences are retained even after the user logs out and logs back in, eliminating the need to reselect them each time. This streamlines the login process and enhances usability, especially for partners and admins operating in multilingual and multicountry environments.
- On the pre-login page, the user initially selects USA as the Country and English as the Language.

- This selected Country-Language combination is stored securely on the server as the user’s preferred Country and Language settings.
- These preferences are visible on the My Account page, where two new fields – Preferred UI Country and Preferred UI Language have been introduced to display the selected values.
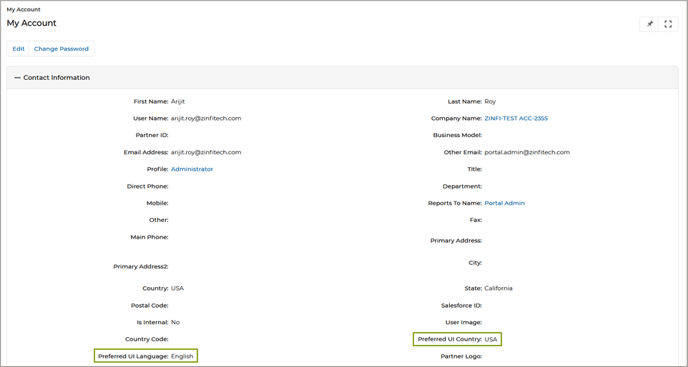
- The user then manually changes the selection to France and French, which are immediately updated and visible under the same My Account fields.
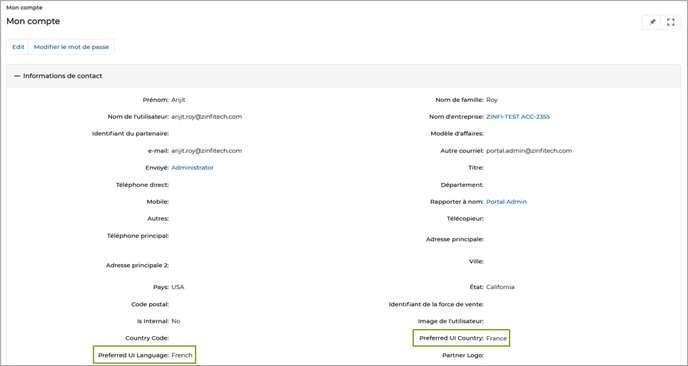
- Upon logging out and logging back into the portal, the system automatically reverts to the initially saved preferences – USA and English – as the default Country-Language selection.
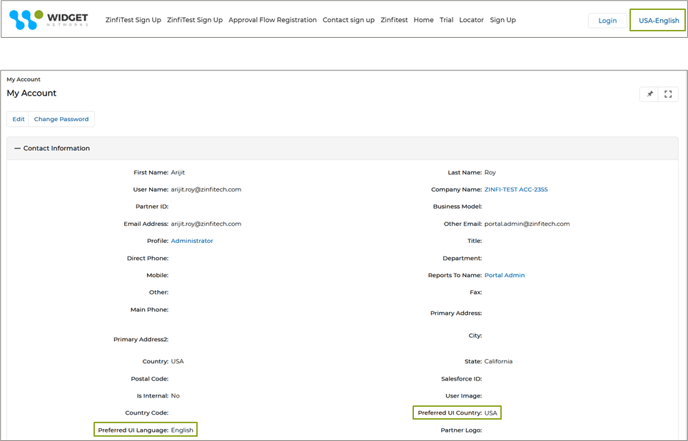
- For all future logins, the system continues to apply the previously chosen preferences unless the user updates them manually.
Origin of Feature
Customer request. This feature automatically retains the user’s initial country and language preferences on the pre-login page of the UPM and eliminates the need to reselect them each time.
CX Strategy Relation (6 S’s)
![]()
Portal User-Facing Benefits
This feature is for Admins and Partners, where their initial country and language preferences on the pre-login page of the UPM are automatically retained and eliminating the need to reselect them each time.
______________________________________________________________________________________
Display Program Type Assignment in Partner Program Sessions List Page
Related Application(s)
Partner Programs Management
Feature Description
The ZINFI UPM portal allows the admin to develop and assign two types of Programs –
Account: Programs designed for a particular account, consisting of multiple users (partners). When a specific user completes a task, level, or Program, it is marked as complete for all users associated with the Account. Other users need not complete the task, level, or program again. If a certain partner completes an ‘Account’ type program, all the users associated with the respective account will get the benefits. (i.e., the program benefits will be unlocked for all the partners associated with the respective account).
Contact: Programs where only the user taking the program will get the benefits associated with the respective program on completion. The benefits associated with the respective program will be unlocked for the respective Partner only.
Adding the Program Assignment Type field on the View My Programs page enhances transparency by clearly indicating whether a Program is assigned at the Contact or Account level. This distinction helps admins and partners easily understand how progress and benefits are tracked and applied, individually or shared across an account. It reduces confusion and improves program management.
- Access the View My Programs page on Onboard > Programs > Partner Sessions. This page provides a summary of all the Enrolled Partners’ Programs' progress. The fields in this section are auto-filled once the Partners are assigned and enrolled in a Program.
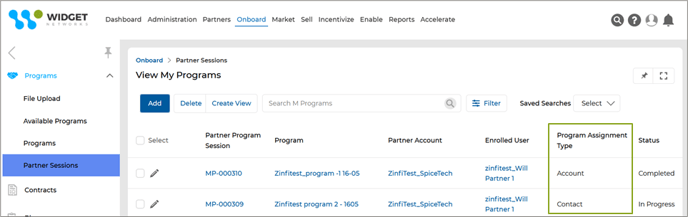
- The newly added Program Type field shows whether a Partner Program is associated with a Contact or an Account. The Enrolled User column displays the name of the user first enrolled and linked to the corresponding Contact or Account.
Note: The names “Partner Program Session ID” and “User Name” have been changed to “Partner Program Session” and “Enrolled User”.
Origin of Feature
This feature displays the Program Assignment Type on the View My Programs page, showing whether an enrolled Program is assigned to a Contact or an Account.
CX Strategy Relation (6 S’s)
![]()
Portal User-Facing Benefits
This feature is for Admins to see whether an enrolled Program is assigned to a Contact or Account user.
______________________________________________________________________________________
Incentive Rules Engine – Import Engine Integration
Related Application(s)
Market Development Funds Management, Generic
Feature Description
The massive release upgrades the Incentive Rules Engine by integrating the UPM Import Engine. This enhanced state-of-the-art tool lets you bulk import Incentive Rules in simple steps. Featuring a sample downloadable legacy worksheet to import Incentive Rules records configurable with the field-mapping engine, you can effectively configure the bulk import of Incentive Rules records in standard global XLSX format and insert/update UPM Incentive Rules records in bulk.
-
- The Import engine lets users create an import instance by assigning a name and selecting the Entity for which Incentive Rules records must be imported.
- Post upload of the Incentive Rules records file in legacy (xlsx) format, the user can easily map the fields of the respective Entity to the column headers in the legacy file, and we are all set to import bulk Incentive Rules records at a single click.
- The import process uses two different templates - one for rule definition and another for entitlement upload.
- While preparing the Excel for MDF Rule import, the customer must provide a unique "Rule Import ID". This ID can be any unique number chosen by the customer. It is used as a key identifier for linking rule and entitlement data.
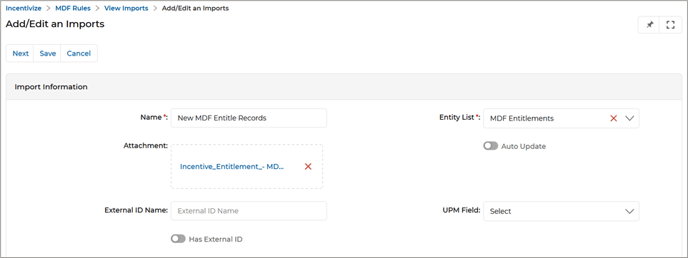
- To add Incentive Rules records in bulk, click the “Import” button in the View MDF Rules page.
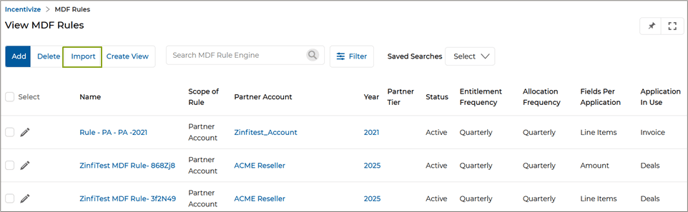
- Clicking the “Import” button will take us to this page that displays earlier Record sets imported.

- Click the Add button, which takes us to the “Add/Edit an Import” page to Import Incentive Rules Records by uploading the records list in a standardized and formatted Excel worksheet.

- Add mandatory details, attach the record list file, and click Save. This takes us to the “Select and Map Fields” page.
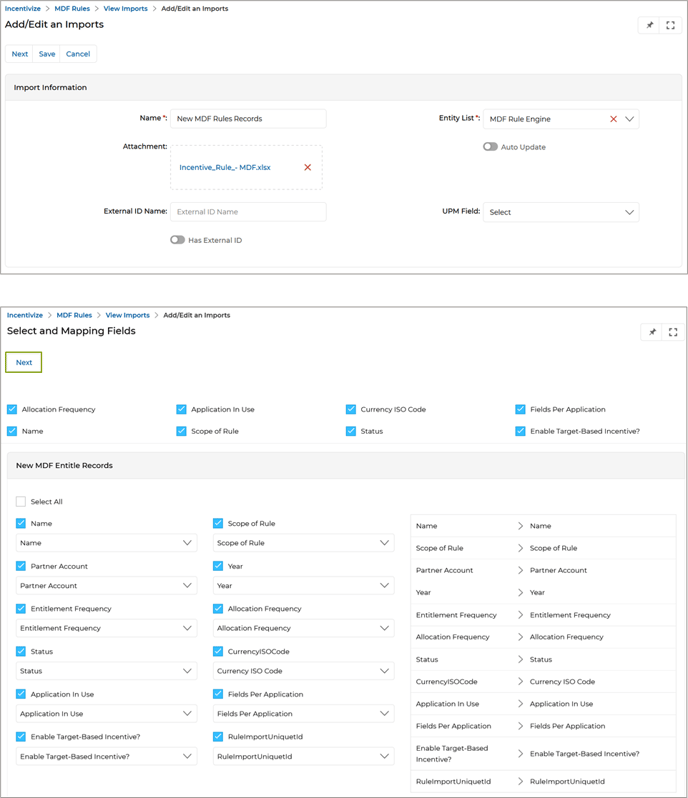
- In this “Select and Map Fields” window, the headers in the Excel worksheet are mapped with the entity's fields. The labels next to each checkbox are the names of the header fields in Excel, and the corresponding entity fields appear in the drop-down. We need to choose the proper entity field in the dropdown to map the record appropriately. Once all the mappings are done, click Next to finish the upload process.
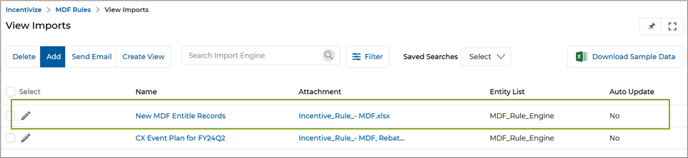
- The uploaded list will be visible on the View Imports page.
- With the uploading of the Excel, MDF Rules will be created, and it will be visible on the View MDF Rules page.
- Clicking on the name of any newly added MDF Rules will take us to its details page, where we will find details that match those in the Excel file.
- A separate Excel template is used to upload Entitlements. Each entitlement entry must include the corresponding Rule Import Unique ID in this template. The system uses the Rule Import ID as a reference to link entitlements to the correct rule. This allows the system to associate each entitlement with the correct
rule imported earlier.
- We need to repeat the process of uploading Excel containing the MDF Rules records as shown earlier.
- Once validated, entitlements are imported and linked to the appropriate rule.

Origin of Feature
Customer request. This feature allows for to import of Incentive Rules in bulk.
CX Strategy Relation (6 S’s)
Sufficiency
Portal User-Facing Benefits
This feature is for Admins to import Incentive Rules in bulk.
______________________________________________________________________________________
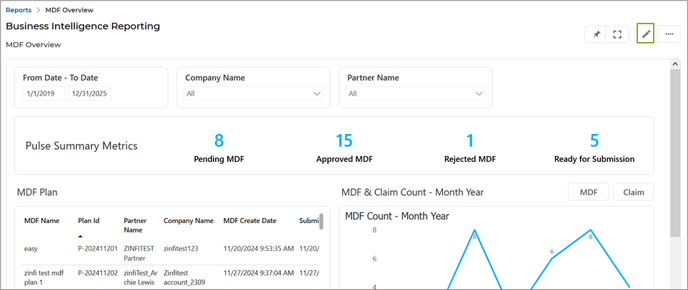
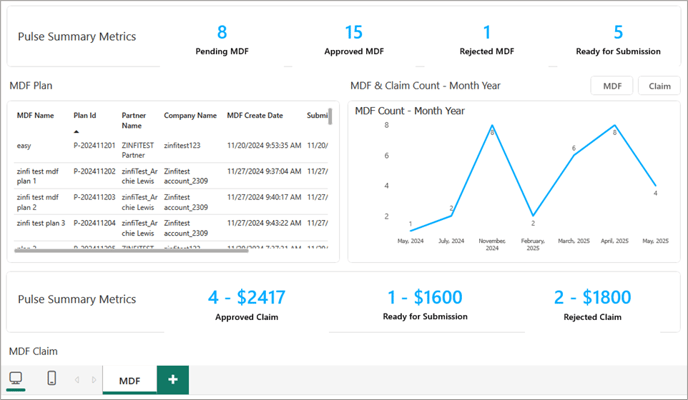
MDF Report Updates
Related Application(s)
Business Intelligence Reports
Feature Description
The updated MDF Report under the Incentivize Reports application enables dynamic and interactive data visualization. It includes standard filters like Date, Company Name, and Partner Name (hidden in partner view) and presents a summary of MDF plans by status – Pending, Approved, Rejected, and Ready for Submission – along with monthly trend graphs for both MDF and Claim counts. The same report format, with role-specific filter visibility, is available for Admins and Partners. This enhancement improves usability, enables better tracking of fund activities, and supports data-driven decisions through clear visibility of plan statuses and trends.
- After logging into the portal, the user navigates to Reports > Incentivize Reports > MDF Overview, where the MDF Overview report is available.
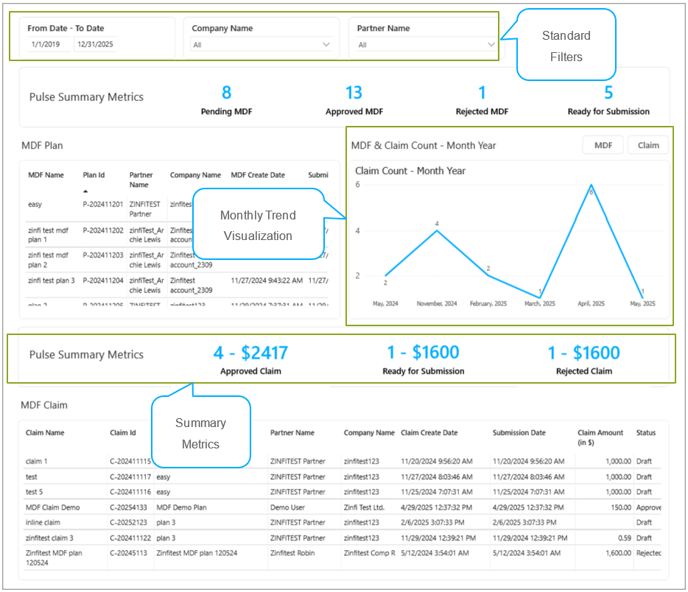
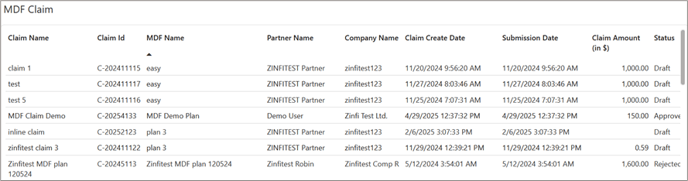
- MDF Claim Table
This table details individual claims
-
- Claim Name: A descriptive name for each claim.
- Claim ID: A unique identifier for each claim.
- MDF Name: The associated MDF plan for the claim.
- Partner Name: The partner associated with the claim.
- Company Name: The company related to the claim.
- Claim Create Date: The date when the claim was created.
- Submission Date: The date when the claim was submitted. These dates are generally close to the creation dates.
- Claim Amount: The monetary value of the claim.
- Status: The current status of the claim (We see a mix of statuses, including Draft, Approved, and Rejected.
Origin of Feature
Customer request. The integration of the MDF Report with Power BI provides real-time insights, improved usability, and enhanced visualization for tracking fund activities and plan statuses effectively.
CX Strategy Relation (6 S’s)
![]()
Portal User-Facing Benefits
This feature allows admins and partners to visualize the MDF Report, which provides real-time insights, improved usability, and enhanced visualization for effectively tracking fund activities and plan statuses.
______________________________________________________________________________________
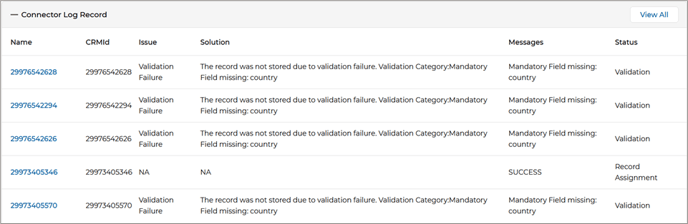
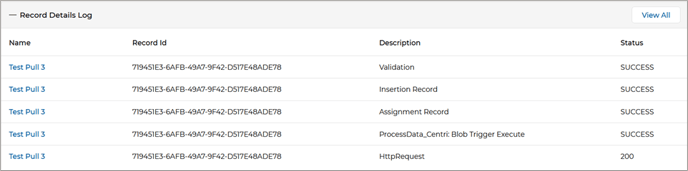
Enhanced Connector Log for End-to-End Data Sync Visibility
Related Application(s)
Connectors Management
Feature Description
When setting up connectors between ZINFI and external CRM platforms like Salesforce or HubSpot, integration errors can occur during initial setup and ongoing data syncs. Previously, limited or unclear error logs made it difficult for admins and users to determine if syncs were triggered, whether data transferred successfully, or why failures occurred, leading to delays and frustration. The enhanced Connector Sync Log now introduces comprehensive, multi-level logging with clearly segregated and well-defined logs for each stage of the sync process. This improvement greatly enhances transparency, allowing admins and support teams to quickly identify, understand, and resolve integration issues more accurately and efficiently.
- Navigate to an API Request from Connectors.
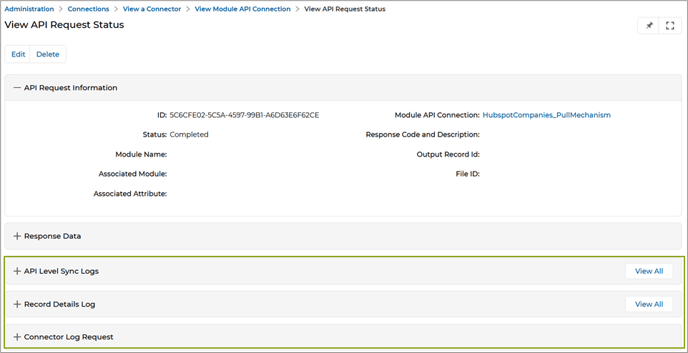
- Four main sections are visible in the API Request details that are explained below:
- API Level Sync Logs
- Record Details Log
- Connector Log Request
- Connector Log Record
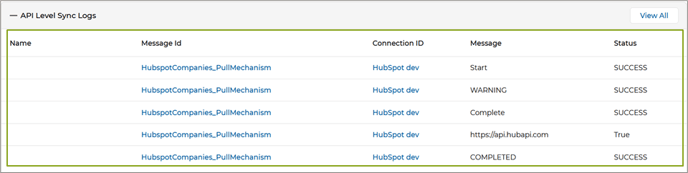
- API Level Sync Logs – This is the first checkpoint in the sync cycle. It logs whether a connection was successfully established between ZINFI and the external CRM platform (e.g., HubSpot). This section displays the status of the connection attempt, the request headers, and the response message from the external CRM. From this log, users verify if the sync was triggered and whether the external platform is reachable.
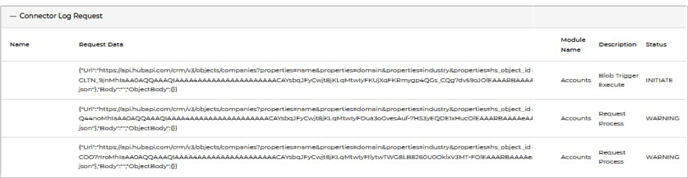
- Connector Log Request – After a successful API connection, the actual request payload sent to the external CRM is logged here. This includes field-level data, request body, endpoint URL, and the stepwise status of the request. This section provides clarity on exactly what data is being pushed/pulled, helping diagnose mismatches quickly. Statuses that are shown here are –
- Initiate – Request sent
- Success: Data received successfully and matches field mapping
- Warning: Minor issues like unmapped fields
- Error: Critical problems, such as missing required mappings or authentication failures
- Connector Log Record – Once data is received from the CRM, that data gets dropped into ZINFI’s temporary storage (BLOB). After data is dropped into the BLOB, it is processed and applied to ZINFI applications (e.g., Contacts, Accounts). This log tracks each record’s journey through the system, highlighting key processing stages and outcomes. Steps tracked include –
- Validation: Ensures the record complies with required data rules.
- Assignment: Allocates the record to the appropriate user or entity.
- Creation/Update: Indicates whether a new record or an existing one was updated.
- Record Details Log – This log captures the final state of each record in ZINFI. It shows whether the record was created or updated, including the internal ZINFI record ID and a history of all actions performed. From this log, the users find the ZINFI Record ID, sync action performed (create/update), and status of each sub-step within that record’s lifecycle. This log offers end-to-end traceability per record, making it easy to isolate problematic records and retry or report them.
Origin of Feature
Customer request. This feature provides detailed connector logs to track and troubleshoot integration issues efficiently.
CX Strategy Relation (6 S’s)
![]()
Portal User-Facing Benefits
This feature is for Admins to track connector syncs with detailed logs for troubleshooting and error resolution
______________________________________________________________________________________
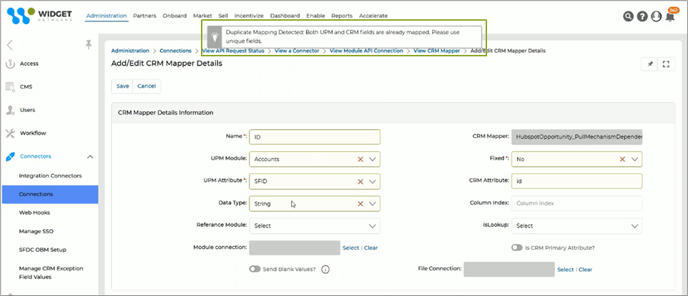
Duplicate Mapping Validation in CRM Mapper
Related Application(s)
Connectors Management
Feature Description
To improve accuracy and avoid sync issues, ZINFI has introduced a more innovative validation system in the CRM Mapper that prevents duplicate field mappings. If ZINFI and CRM fields are already linked, the system will stop setting up such mapped fields and display a clear error message. A warning appears if only one side is duplicated, allowing admins to confirm before proceeding. These validations ensure each field is mapped only once, helping admins set up cleaner, conflict-free integrations with greater confidence and ease.
Validation Scenarios
- Both Fields Duplicate: If the same ZINFI field is mapped more than once to the same CRM field, or vice versa, the system prevents saving the record, and a validation message is displayed "Duplicate Mapping Detected: Both UPM and CRM fields are already mapped. Please use unique fields."
- Single Field Duplicate: If one CRM field is mapped to multiple ZINFI fields, or multiple CRM fields are mapped to the same ZINFI field, the following message is displayed: "Warning: One of the fields is already mapped. Please verify before saving. One Source field can be mapped to multiple destination fields, but multiple sources cannot be mapped to a single destination field. Be sure of your mapping before proceeding to save. Proceed with save?"
The record can be saved upon admin confirmation.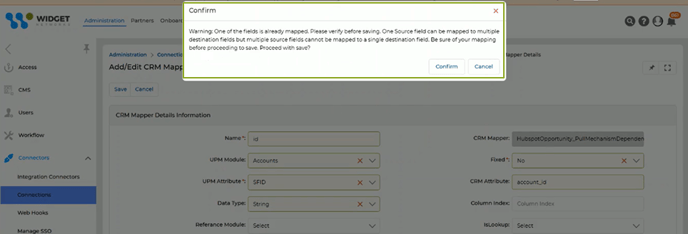
- Sync Direction: To prevent configuration errors during field mapping, hard validations are enforced based on the data sync direction (GET, POST, PUT, or PATCH).
-
- GET (Inbound Sync):
In this case, the ZINFI UPM field acts as the destination, and the same UPM field cannot be mapped more than once. If the user tries to map the same UPM field more than once in a GET sync scenario, the system will trigger a validation error and prevent the mapping from being saved, and the following error message is displayed – "Duplicate Mapping Detected: Destination field is already mapped. Please use unique ZINFI UPM fields based on your type: GET."
- GET (Inbound Sync):
-
- POST / PUT / PATCH (Outbound Sync):
For these operations, the CRM field becomes the destination, and each CRM field must be uniquely mapped. If the user tries to map the same CRM field more than once in a POST, PUT, or PATCH (outbound) sync scenario, the system will trigger a validation error and block the mapping from being saved and the following error message is displayed – "Duplicate Mapping Detected: Destination field is already mapped. Please use unique CRM fields based on your type: POST/PUT/PATCH."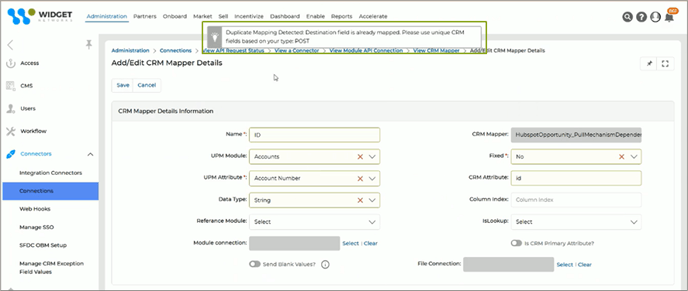
- POST / PUT / PATCH (Outbound Sync):
Origin of Feature
Customer request. This feature prevents duplicate field mappings in CRM integrations by enforcing strict validation rules based on sync direction.
CX Strategy Relation (6 S’s)
![]()
Portal User-Facing Benefits
This feature prevents Admins from mapping the same fields multiple times in CRM syncs, ensuring clean and error-free configurations.
______________________________________________________________________________________
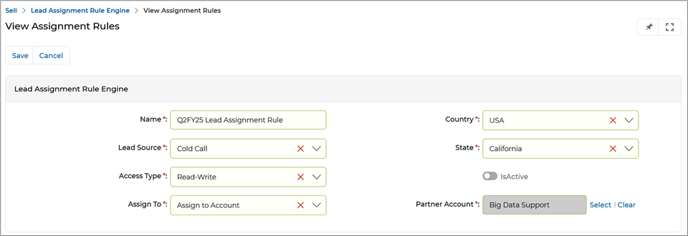
Lead Assignment Rule Engine
Related Application(s)
Partner Leads Management
Feature Description
The Lead Assignment Rule Engine offers a smarter way to manage leads by letting Admins create tailored distribution rules based on attributes like country, state, and lead source. It automates the entire process of assigning leads to the right users, accounts, or groups, cutting down on manual effort and speeding up response times. Through a user-friendly setup, Admins can choose conditions from dropdown menus and map out how leads should be routed. They can also define whether the assigned users have read-only or read-write permissions. This feature ensures leads are always directed to the most relevant teams, maximizing productivity and reducing the risk of missed follow-ups.
- After logging into the portal, the user navigates to Sell > Leads > Lead Assignment Rule Engine and clicks the Add button to open the View Assignment Rules page.
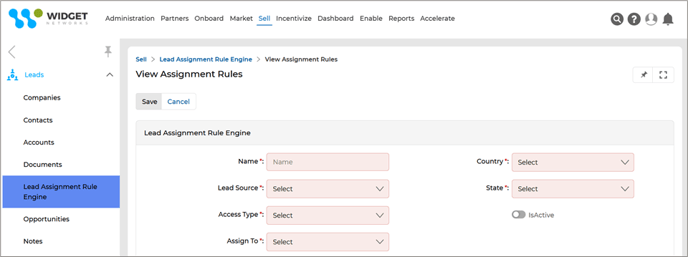
- In the View Assignment Rules window, the user fills in the necessary details to configure the Lead Assignment Rule. The required fields are:
-
- Name – Enter a name for the Lead Assignment Rule.
- Country – Choose the desired country from the dropdown list.
- Lead Source – Select the source of the lead (e.g., Cold Call, Contact Us, Direct Mail, etc.) from the available options.
- State – Pick the appropriate state from the dropdown list.
- Access Type – Choose between Read-Only or Read-Write access type.
- Assign To – Specify where the lead should be assigned: either to a User, an Account, or a Group.
- After providing all the necessary details, click Save to save the rule configuration.
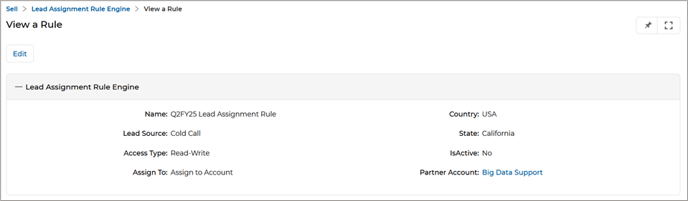
- Once a lead is created and meets the criteria defined in the Lead Assignment Rule, the system will automatically trigger the rule and assign the lead according to the configured parameters.
Origin of Feature
Customer request. This feature automates lead assignments by defining rules based on lead attributes in the Lead Assignment Rule Engine.
CX Strategy Relation (6 S’s)
![]()
Portal User-Facing Benefits
This feature allows Admins and Partners to automate lead routing based on defined criteria in the Lead Assignment Rule Engine.
______________________________________________________________________________________
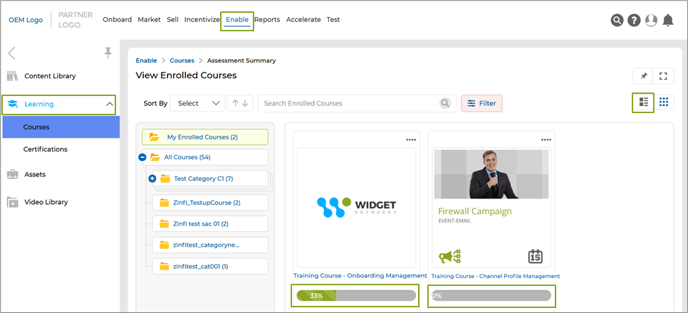
Progress Bar in Card View and Thumb View for Enrolled Courses and Certificates
Related Application(s)
Partner Learning Management
Feature Description
The feature to display a progress bar in the card and thumbnail views for enrolled courses and certificates allows users to instantly see their exact completion percentage without opening each item’s detail page. The progress bar reflects real-time data, updating dynamically as users advance through the training. It visually indicates progress with an exact percentage and fills proportionally, showing an empty bar for 0% and a full bar for 100% completion. This enhancement improves usability by offering a quick, at-a-glance overview of learning status, helping users stay informed and engaged throughout their training journey.
- Log in to the portal as a Partner and navigate to Enable > Learning > Courses > My Enrolled Courses to view the list of enrolled courses.
- Enrolled courses are displayed in both Card View and Thumbnail View.
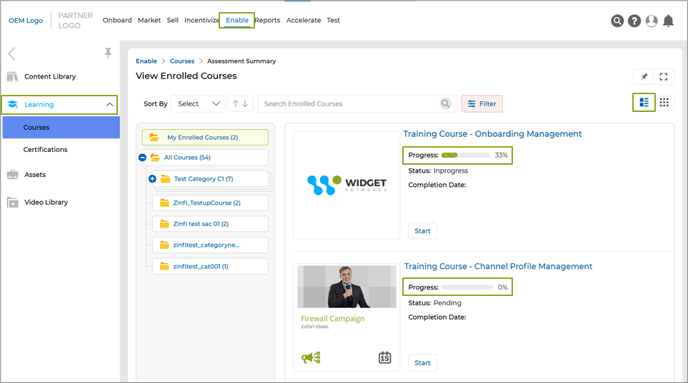
- A horizontal progress bar is shown for each enrolled course in card view (above image) and thumbnail view (below image), providing a visual representation of the user’s progress.
- Similarly, navigate to Enable > Learning > Certificates > My Enrolled Certificates to view enrolled certificates.
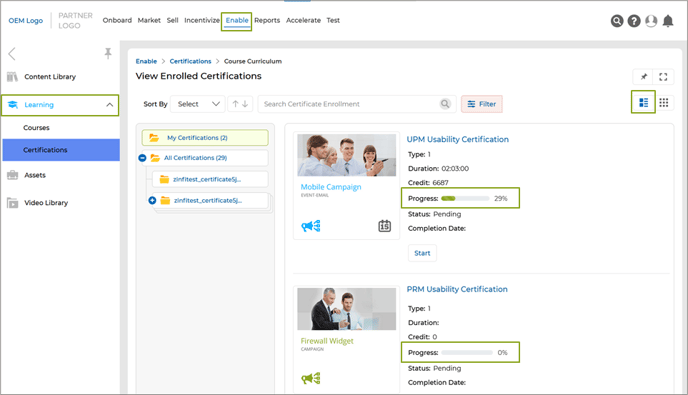
- Each certificate also features a horizontal progress bar in both Card View (above image) and Thumbnail View (below image).
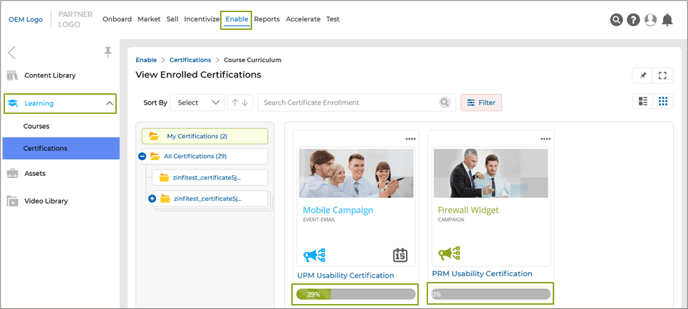
- The progress bar reflects the exact percentage of completion.
- The numerical percentage (e.g., 29%) is displayed clearly on or beside the progress bar for better visibility.
- The progress bar updates in real time as the user progresses through the course or certificate, offering an immediate and accurate snapshot of learning status without going into the details page for progress updates.
Origin of Feature
Customer request. This feature enhances user experience by displaying a progress bar in the card and thumbnail views of enrolled courses and certificates, eliminating the need to open detail pages to check progress.
CX Strategy Relation (6 S’s)
![]()
Portal User-Facing Benefits
This feature allows Partners to easily track their course and certificate completion from the horizontal progress bar with exact percentage in the card and thumbnail views in the listing page.
______________________________________________________________________________________
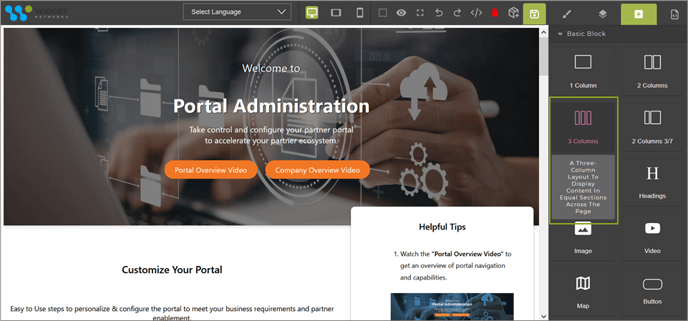
Tooltips for CMS Editor Components
Related Application(s)
CMS Management
Feature Description
This feature improves the usability of the CMS editor by introducing informative tooltips for key layout and content components. These tooltips provide precise descriptions of each component’s purpose and functionality, helping users, especially new or non-technical ones, understand how to effectively use elements like “One Column,” “Text,” or “Image.” The feature reduces confusion, minimizes errors, and streamlines the page-building experience by offering guidance directly within the editor interface.
- Tooltips have now been embedded within the CMS editor interface. These appear when users hover over or interact with a CMS component name or icon.
- Each tooltip provides a brief but informative explanation of the component’s functionality, helping users understand how it contributes to page structure or content.
Origin of Feature
Customer request. This feature enhances usability within the CMS editor by introducing tooltips for key components, helping users understand the purpose and functionality of each building block.
CX Strategy Relation (6 S’s)
![]()
Portal User-Facing Benefits
This feature allows Admins to quickly understand the function of each CMS component through descriptive tooltips.
______________________________________________________________________________________
Editing Reports - Simplified
Related Application(s)
Business Intelligence Reports
Feature Description
In Power BI Desktop and the Power BI service, the report editor is where you design the reports your consumers see, with charts, tables, maps, and other visuals. It's similar in both Power BI Desktop and the Power BI service environments. Typically, you start creating a report in Power BI Desktop. Then you publish it to the Power BI service, where you can continue modifying it. The report editor is only available in Editing View in the Power BI service. To open a report in Editing view, you must be a report owner or creator or have at least a Contributor role in the workspace that houses the report.
The new feature introduces a customizable edit mode within the Business Intelligence Reporting App, allowing users to tailor the layout and visualization of reports to suit their specific roles and client requirements better. By clicking the edit (pencil) icon, users can access tools such as the Ribbon, the Report Canvas, the Filters Pane, and the Visualization Pane options to modify column visibility, add or remove widgets, and configure tab lists.
- Clicking the edit icon in the Report dashboard takes us to the editable page, where we can edit the report's layout.
- The Power BI report editor is divided into several main sections:
-
- The Ribbon
- The Report Canvas
- The Filters Pane
- The Visualizations Pane
- The Data Pane
- The Ribbon – The Modelling Ribbon allows you to model and manage your data.

- The Report Canvas - The report canvas is where your report is displayed. When you use the Fields, Filters, and Visualizations panes to create visuals, the visuals are built and shown on your report canvas. Each tab at the bottom of the canvas represents a page in the report. Select a tab to open that page.
- The Report Editor Panes - Three panes are visible when we first open a report: Filters, Visualizations, and Fields. The first two panes, Filters and Visualizations, control what your visualizations look like: type, colors, filtering, and formatting. The last pane, Fields, manages the underlying data being used in the visualizations.
- The Filters Pane - Use the Filters pane to view, set, and modify persistent filters for your reports at the page, report, drillthrough, and visual-level. We can do ad-hoc filtering on report pages and visuals by selecting elements of the visuals or by using tools like slicers. Filtering in the Filters pane has the advantage that the state of the filters is saved with the report. We can filter using a field that isn't already in one of the visuals in our report. When we create a visualization, Power BI automatically adds all the fields in the visualization to the visual-level filters area of the Filters pane. If we want to set a visual, page, drillthrough, or report filter using a field that isn't in the visualization, drag it to one of the Filter's buckets.
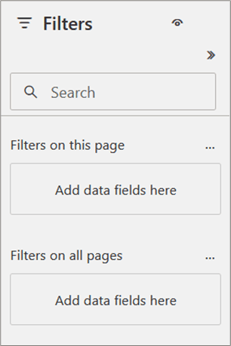
- The Visualizations Pane – Here is where we select a visualization type. The small icons show the different types of visualizations we can create. If we start building a visualization by selecting fields without selecting a visualization type first, Power BI picks the visualization type for us. We can keep Power BI's selection, or change the type by selecting a different icon.
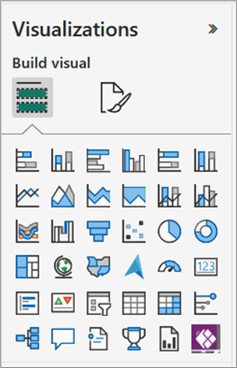
- The Data Pane - The Data pane displays the tables, folders, and fields in our data that are available for us to use to create visualizations. Drag a field onto the page to start a new visualization. When we add a checkmark next to a field, Power BI adds that field to the active or new visualization. We can also drag a field onto an existing visualization to add the field to that visualization. Power BI uses many different icons to indicate the types of fields in a report.
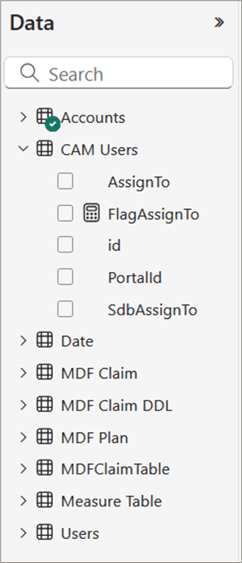
- The Filters Pane - Use the Filters pane to view, set, and modify persistent filters for your reports at the page, report, drillthrough, and visual-level. We can do ad-hoc filtering on report pages and visuals by selecting elements of the visuals or by using tools like slicers. Filtering in the Filters pane has the advantage that the state of the filters is saved with the report. We can filter using a field that isn't already in one of the visuals in our report. When we create a visualization, Power BI automatically adds all the fields in the visualization to the visual-level filters area of the Filters pane. If we want to set a visual, page, drillthrough, or report filter using a field that isn't in the visualization, drag it to one of the Filter's buckets.
Origin of Feature
Customer request. This feature enhances user experience in the Report Overview page by allowing users to enter edit mode through the pencil icon, enabling customization of Power BI report layouts.
CX Strategy Relation (6 S’s)
![]()
Portal User-Facing Benefits
This feature allows Admins to edit the Power BI report layout using the pencil icon.
______________________________________________________________________________________
Collapsible CTA Button
Related Application(s)
Generic
Feature Description
This feature enhances user experience by allowing Admins to configure a clear and clutter-free action area through a collapsible primary CTA (Call-to-action) button setup. Admins can designate a single action, such as "Add", which is prominently displayed, while grouping less frequently used actions under a collapsible dropdown. This simplifies the interface, helps users focus on key tasks, and reduces visual noise by hiding secondary actions until needed.
- Log in to the portal as an Admin and navigate to Partners > Partners > Partner Accounts, to reach the View Partner Accounts page, where all the Partner Accounts are listed.
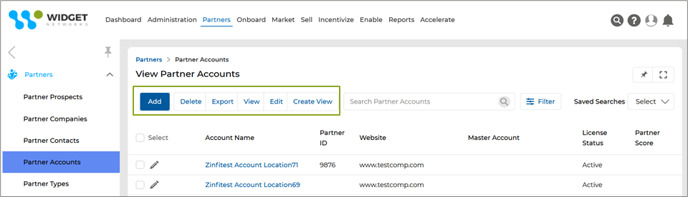
- Now, navigate to Workflow > Pages > Partner Accounts – List and go to the configuration page.
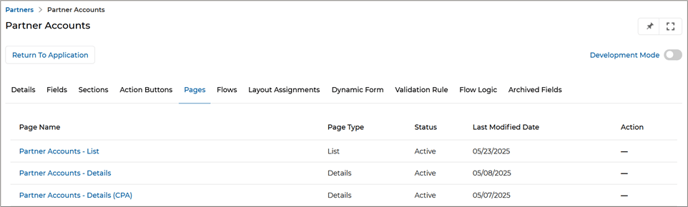
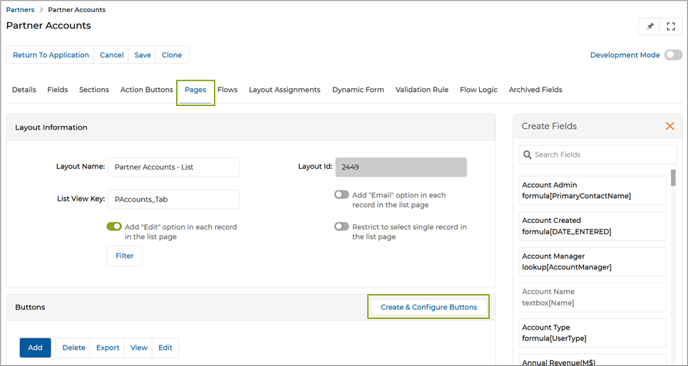
- Click “Create & Configure Buttons” page and reach Create & Configure Buttons page.
- We see that by default “Add” button is already configured as the Primary Button.
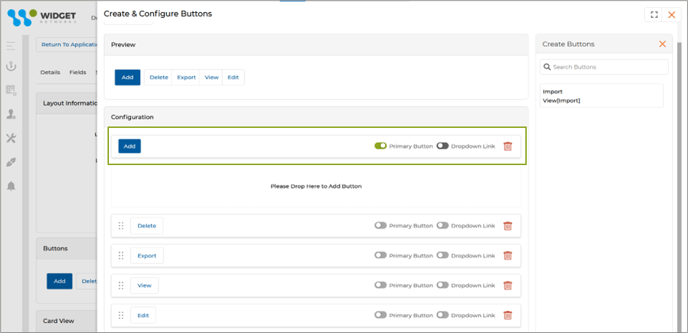
- Admins can configure one button as each page's “Primary” action. Only one button can be marked as Primary at a time. If another button is selected, the system alerts the admin that only one primary button is allowed.

- The primary button is visually distinct and blue to indicate the main action expected from the user.
- Less frequently used buttons (e.g., “Delete,” “Export,” “View,” “Edit,” etc.) can be placed inside a collapsible dropdown menu by enabling the “Dropdown Link” toggle button.

- This menu appears when the user hovers over or clicks a down-arrow icon beside the primary button. This helps maintain a clean interface by hiding secondary actions while keeping them easily accessible.
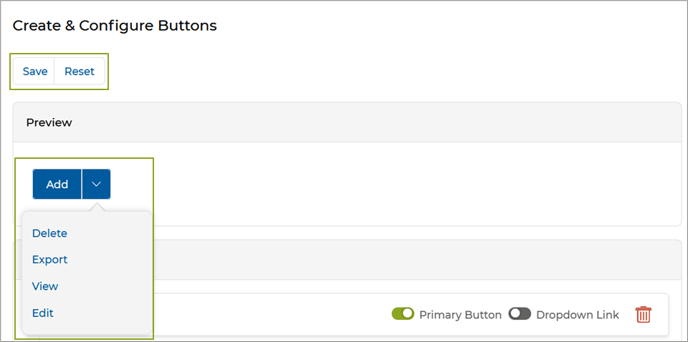
- A real-time preview panel reflects changes instantly, helping admins visualize the final UI before saving.
- Once the desired configuration is set, admins can click "Save" to apply the changes to the application page. A "Reset" button is available to revert to the default layout, i.e., the original setup before any customizations.
- Once we return to the View Partners Accounts page, we see a streamlined interface with prominently displayed the most important action (Primary Button). All secondary actions are grouped under a collapsible menu, reducing visual clutter and making the interface more intuitive and focused.
Origin of Feature
Customer request. This feature highlights the main action and hides secondary buttons in a collapsible menu.
CX Strategy Relation (6 S’s)
![]()
Portal User-Facing Benefits
This feature allows Admins to highlight the primary action on a page while organizing secondary buttons into a collapsible menu.
______________________________________________________________________________________
Record-Level Log History
Related Application(s)
Workflow Management
Feature Description
Within Workflow, Record-Level Log History is an administrative configuration that enables tracking of all changes made to records in any application (like Prospects, Contacts, etc.). This feature helps ensure data accountability by capturing detailed logs of field-level changes, accessible to both Admins and Partners based on their field access rights.
- Navigate to Workflow and open the desired application in Edit mode. In this example, we have selected Users.
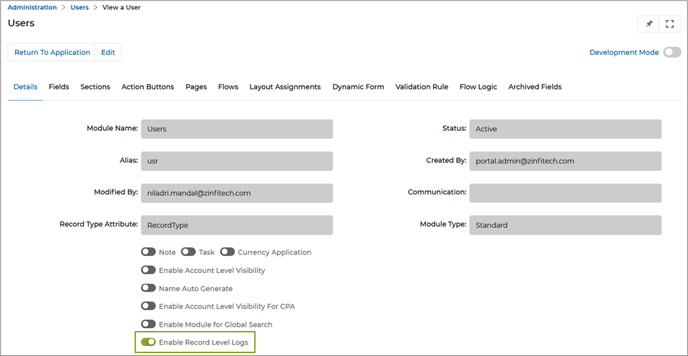
- Enable "Enable Record Level Logs" as shown in the above image. This enables the history icon to appear on records under that application.
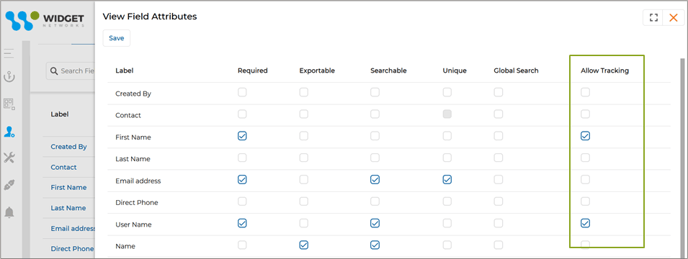
- Now, we go to the Fields section within the same application and enable Development Mode.
- We click Set Field Attributes to open the side configuration panel (View Field Attributes).
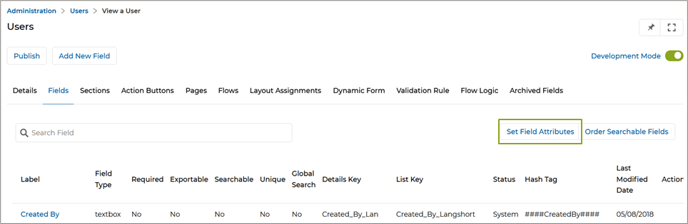
- For each field we want to track, enable the "Allow Tracking" option (as shown in the above image). Only changes to fields with this setting enabled will be logged. Once done, click Save.
- From this point on, any inserts (creation) or updates to tracked fields will be captured in the system.
- From then on, any inserts (creation) or updates to tracked fields will be captured in the system.
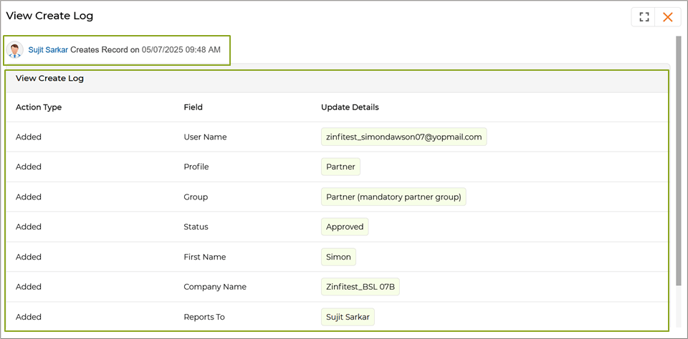
- Once we go to the user details page, the History icon appears.
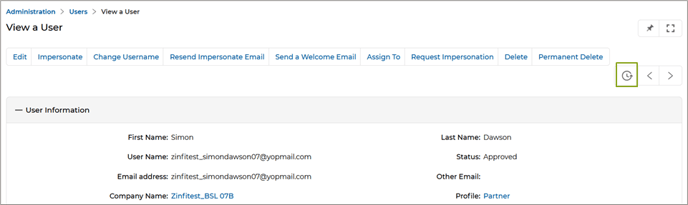
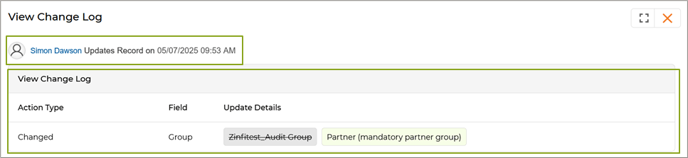
- Clicking the History icon takes us to the View Record History window, where logs are visible.

- Clicking View Create Log opens a detailed view showing the trackable fields and their corresponding values that were entered when the user record was created.
- Clicking View Change Log displays the details of any modifications made to trackable fields, including the original and updated values.
Origin of Feature
Customer request: This feature enables Admins to track field-level changes in records by configuring logging settings directly within the Workflow application.
CX Strategy Relation (6 S’s)
![]()
Portal User-Facing Benefits
This feature lets Admins track field changes by enabling record-level logging and selecting which fields to track via Workflow.
______________________________________________________________________________________
Contracts Agreement Hub
Related Application(s)
Partner Contracts Management
Feature Description
The Agreement Hub in UPM is a powerful administrative feature streamlining partner onboarding by enforcing agreement acceptance before granting portal access. It allows OEMs to configure customizable templates, either digital (via DocuSign) or non-digital (via system email), ensuring all required terms and conditions are acknowledged by partners in a secure and auditable manner. With built-in signature tracking, role-based access control, and automated verification, the Agreement Hub enhances compliance, improves onboarding efficiency, and reduces the risk of unauthorized access, making it a vital tool for managing contractual handoffs during channel expansion.
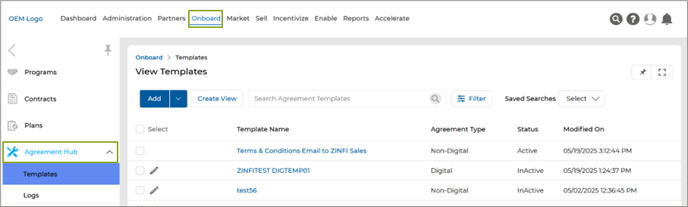
- Log in to the UPM as an Admin, navigate to the Onboard section in the top zone, click on the Agreement Hub menu, and then Templates within the Agreement Hub.
- To create a new template, click Add, which takes us to the Add/Edit Template page.
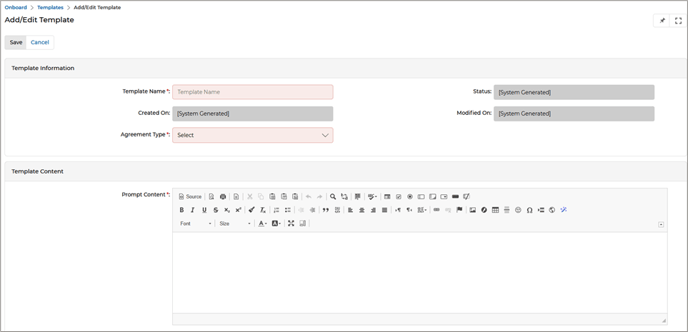
- Fill in the required fields:
-
- Template Name: Name of the Agreement Template.
- Status: Status of the Template (Active/Inactive).
- Created On: The date the template was created.
- Modified On: The date when any changes were made to the agreement template
- Agreement Type: Agreement Type can be of two types –
- Digital: Requires DocuSign integration
- Non-Digital: Sends a system-generated email
- Upload DocuSign File: (for digital agreements)
- System Email: (for non-digital agreements)
- Prompt Content: The content will appear to the end users when they attempt to log in to the UPM portal.
- Once done, click Save.
- Click “Activate Template” to activate the template.
Note: Only one template can remain active at any given time. If an existing template is already active, attempting to activate a new template will trigger an error message. To proceed, you must first deactivate the currently active template before enabling another.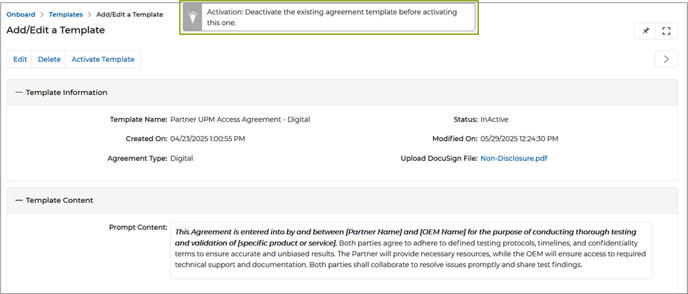
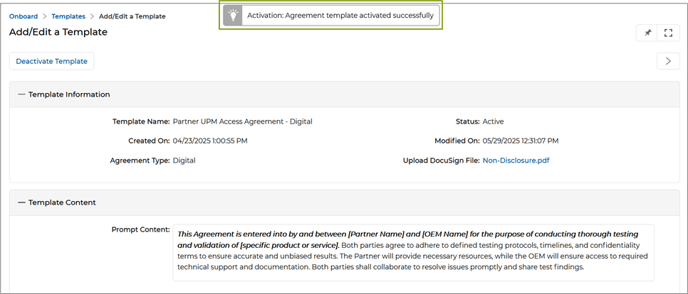
- Once the template is successfully activated, a confirmation message will appear on the screen, indicating that the activation has been completed.
Partner Experience
- Digital Agreement Flow (DocuSign)
- Partner logs in and sees the agreement screen.
- The partner selects the checkbox to acknowledge “I agree to the terms and conditions” and then clicks the “Accept” button to proceed.
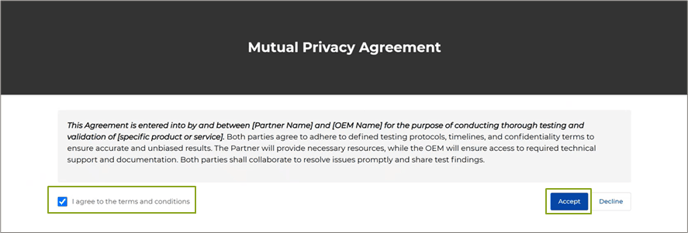
- The Partner receives a DocuSign email.
- The Partner reviews the document and completes the digital signature process.
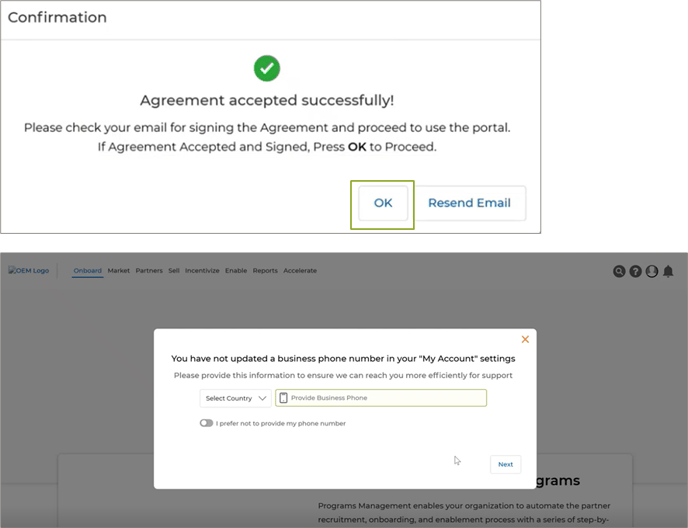
- Upon successful signing, a confirmation message appears on the UPM screen. Once the Partner clicks OK, access to the UPM portal is granted.
- Non-Digital Agreement Flow
- Partner logs in and sees the agreement screen.
- The partner selects the checkbox to acknowledge “I agree to the terms and conditions” and then clicks the “Accept” button to proceed.

- Once the Partner accepts the agreement, a confirmation message appears on the UPM screen. Once the Partner clicks OK, access to the UPM portal is granted.

- The Partner will receive a copy of the agreement via email.
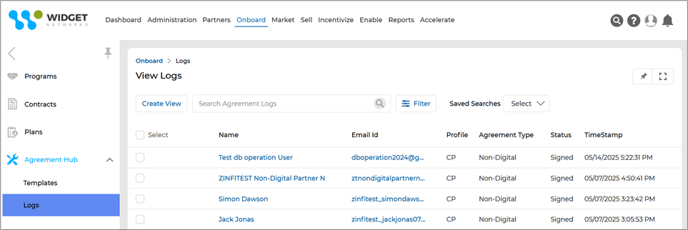
- Once the Admin navigates to the View Logs page by clicking Onboard > Agreement Hub > Logs, he can view the list of agreements signed so far.
Note: Only OEM internal administrators can manage templates and logs.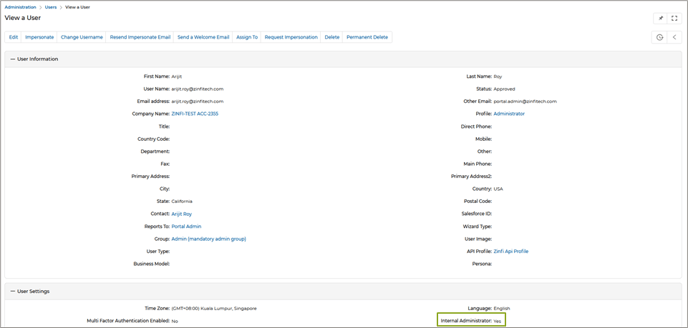
Origin of Feature
Customer request. This feature ensures partners accept required agreements, set up in the Agreement Hub, before accessing the UPM portal.
CX Strategy Relation (6 S’s)
![]()
Portal User-Facing Benefits
This feature allows internal Admins to configure mandatory agreements that Partners must accept in the Agreement Hub before accessing the UPM portal.
______________________________________________________________________________________
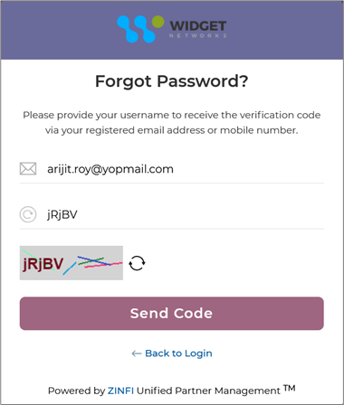
Updated CAPTCHA in the Reset Password Page
Related Application(s)
Users & Territories Management
Feature Description
To ensure a seamless password reset experience for users across all regions, especially in countries where access to Google services is restricted (such as China), the UPM platform has significantly enhanced its reset password functionality. Previously, the platform relied on Google reCAPTCHA to verify human users, which worked effectively in most regions. However, users in China faced difficulties resetting their passwords due to Google reCAPTCHA being blocked.
In response to this challenge, the platform now features a fully custom-built CAPTCHA solution free from third-party dependencies. This new CAPTCHA is designed to function consistently across all geographies, ensuring no user is restricted from accessing the password reset process due to regional limitations.
- The reset password page now displays a simple, intuitive CAPTCHA image that contains alphanumeric characters for the user to enter.
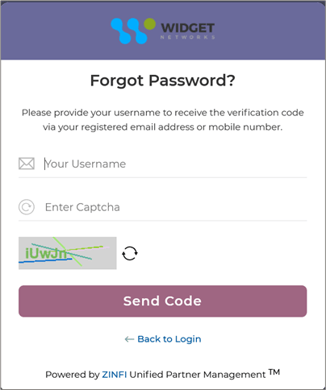
- A refresh icon allows users to generate a new CAPTCHA image if the current one is difficult to read.

- Once the user successfully enters the CAPTCHA and submits their request, the standard password reset flow continues without any additional steps.
- Once a lead is created and meets the criteria defined in the Lead Assignment Rule, the system automatically triggers the rule and assigns it according to the configured parameters.
- The new CAPTCHA is developed in-house, eliminating reliance on external plugins, scripts, or services, ensuring reliability, speed, and security.
Origin of Feature
Customer request. This feature replaces Google reCAPTCHA with a custom CAPTCHA on the reset password page to ensure global accessibility.
CX Strategy Relation (6 S’s)

Portal User-Facing Benefits
This feature replaces Google reCAPTCHA with a custom CAPTCHA on the reset password page, so Admins and Partners in all countries can reset their passwords without issues
______________________________________________________________________________________
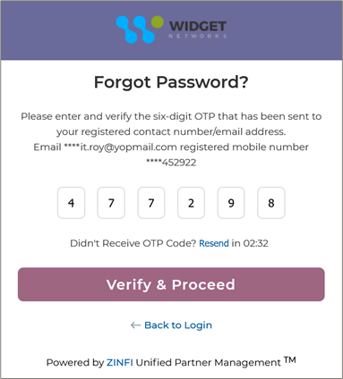
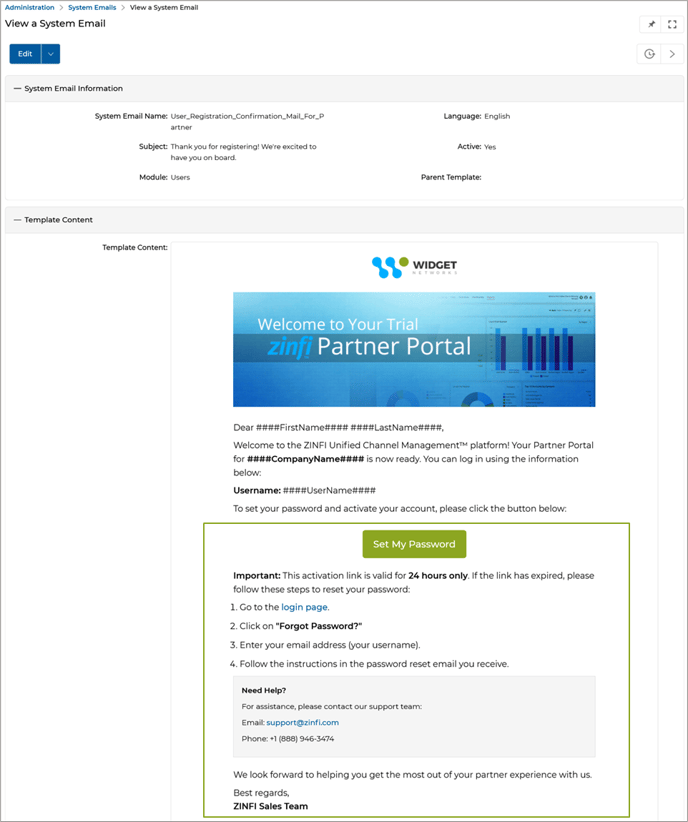
Enhanced Password Reset Email Instructions
Related Application(s)
Alerts & Notification Management
Feature Description
The system automatically sends a welcome email whenever a new partner registers on the platform and their status is approved. This email includes a secure link allowing the partner to set or reset their password. Many partners often overlook this email or delay acting on it. Since the password reset link is time-sensitive and expires after 24 hours, attempts to use the link beyond this window result in errors, preventing successful password resets. Email delivery might sometimes be delayed due to system or network factors, causing partners to receive the reset email later than expected. This delay increases the likelihood of expired tokens and user frustration. Detailed instructions have been incorporated into the password reset email to mitigate these issues. These instructions explicitly inform partners that the password reset link remains valid for only 24 hours from receipt.
The email now guides users on what to do if their reset link expires – they are advised to revisit the login page and initiate the password reset process again to generate a fresh reset link.
- Navigate to Administration > Alerts > System Emails and go to the details page of the Password Reset Email, where we find the updated instructions informing partners that the reset link is valid for only 24 hours from the time it is received.
- The Password Reset Email also includes clear and helpful instructions for users on what to do if their reset link expires, encouraging them to revisit the login page and start the password reset process anew to obtain a fresh, valid link.
Origin of Feature
This feature enhances the password reset email by adding clear instructions on token expiry and guiding users on how to request a new reset link.
CX Strategy Relation (6 S’s)
Portal User-Facing Benefits
This feature ensures users receive clear password reset instructions, including token expiry details, and guides them on how to request a new reset link if needed.
______________________________________________________________________________________
Prospect-to-Account Mapping in Dynamic Forms
Related Application(s)
Workflow Management
Feature Description
This feature streamlines the partner registration process by automatically validating and mapping prospect information, such as email addresses, company names, or partner numbers, to existing partner accounts. Auto-populating account details when a match is found reduces manual data entry and errors, improving efficiency and accuracy. The prospect is saved appropriately if no match exists, ensuring no data is lost. This flexible validation system enhances data integrity and simplifies management, accelerating partner engagement and improving user experience.
- Navigate to Administration > Workflow > Forms and go to the details page of the Dynamic Form.
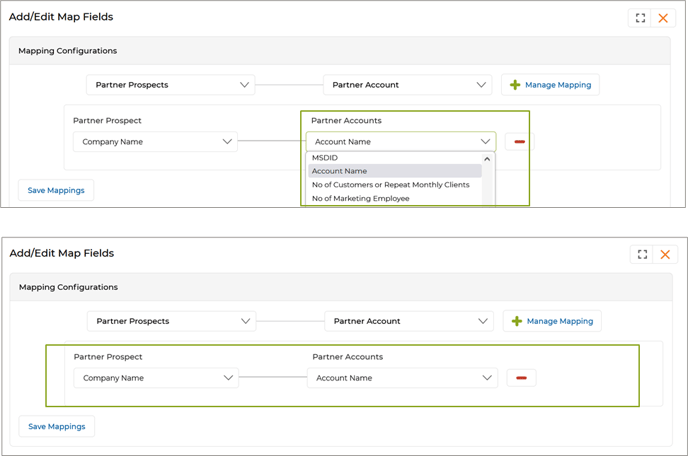
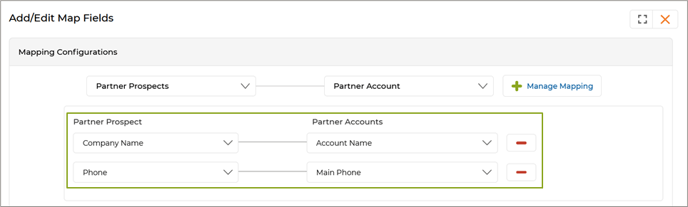
- Click Map Fields, which takes us to a dedicated window to map Partner Prospect details (such as company name) to existing account details (such as account name) in the platform.
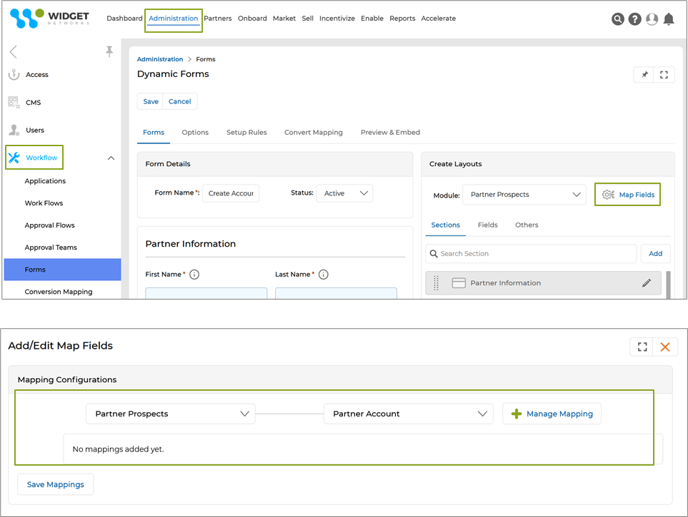
- Clicking "Manage Mapping" will make the dropdown lists visible, from which the user will be able to select the desired value.
- In the above example, "Company Name" is selected as the value in the Partner Prospect dropdown list.
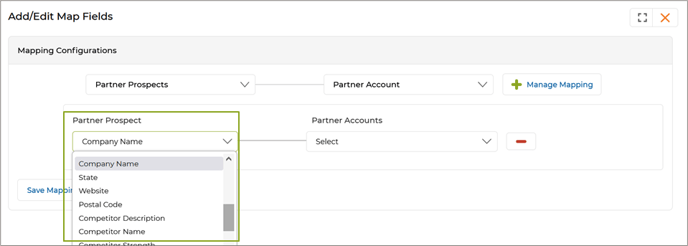
- In the Partner Accounts dropdown, "Account Name" is selected as the corresponding value.
- Once the field mapping is saved, the system checks whether the Company Name provided in the form submission matches an existing Partner Account.
- If a match is found based on these parameters, the system auto-populates the account information to streamline data entry.
- If the entered company name or details do not exist in the portal, the prospect is saved as a "Partner Prospect" by default without auto-population.
- While multiple parameters can be added for reference, validation is performed based on only one selected parameter.
Origin of Feature
This feature enables automated mapping of prospect information, such as email, company name, or partner number, to existing partner accounts, ensuring accurate validation and reducing manual data entry during the onboarding process.
CX Strategy Relation (6 S’s)
![]()
Portal User-Facing Benefits
This feature allows Admins to automatically map prospect information, such as email, company name, or partner number, to existing partner accounts, ensuring accurate validation and seamless data capture during form submissions.
______________________________________________________________________________________
Dynamic Forms - Enhanced Conditional Field Display Logic
Related Application(s)
Workflow Management
Feature Description
Previously, conditional field visibility was limited to a single value – for example, “If Country = USA, then show State.” With the enhancement, Admins can now define rules based on multiple values for a single field, such as “If Country = USA OR Albania”, then show State OR City, respectively. The updated logic supports multiple condition values per field, allowing broader configurations. For example, fields can now be displayed when “Country = Albania OR Andorra”. Admins can define the values that will trigger the visibility using dropdown options. These values are controlled from the backend and can include any combination of countries, partner types, business units, etc. Admins can decide whether specific fields are shown or hidden depending on these conditions, allowing forms to dynamically adjust based on user input and streamline the data collection process.
- Example: If “Country = USA”, then “State” will be shown. If “Country = Albania OR Andorra”, the system will display “City”, while hiding fields specific to the USA.
- Navigate to Administration > Workflow > Forms and go to the details page of the Dynamic Form.
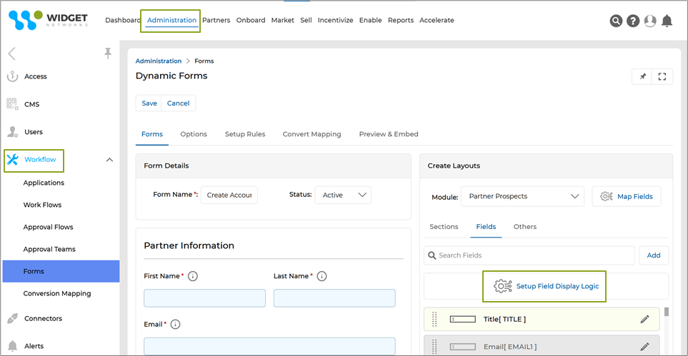
- Click “Setup Field Display Logic”, which takes us to the Add/Edit Flow Logic page.
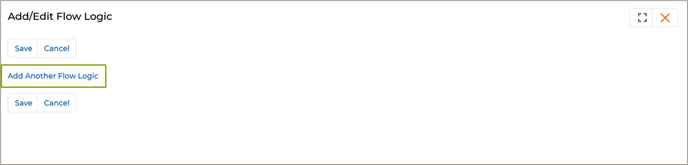
- We click the “Add Another Flow Logic” button, which will open the “If” dropdown. This dropdown consists of two values – Country and State.
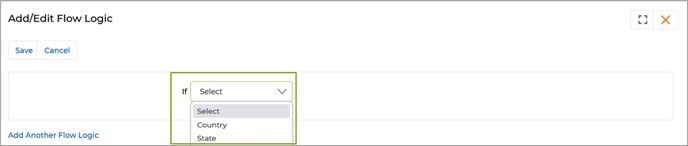
- In this example, we select “Country” and that opens another dropdown, which consists of “In” and “Not In”.
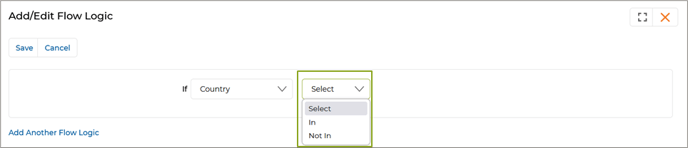
- Selecting a value in this dropdown will provide us with options to select countries by clicking Select.
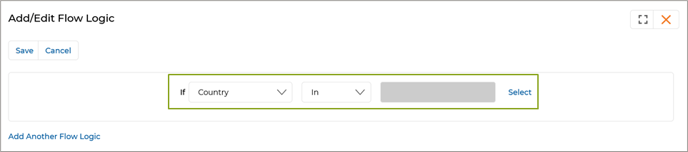
- Multiple countries can be selected as per requirement.
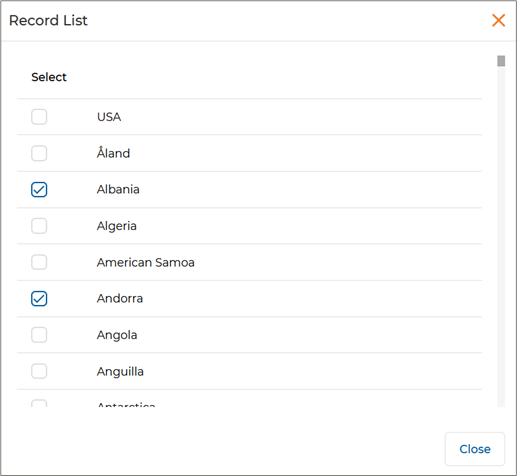
- Selecting countries will open the “Then Display” dropdown list. We can select appropriate values from there as per necessity.
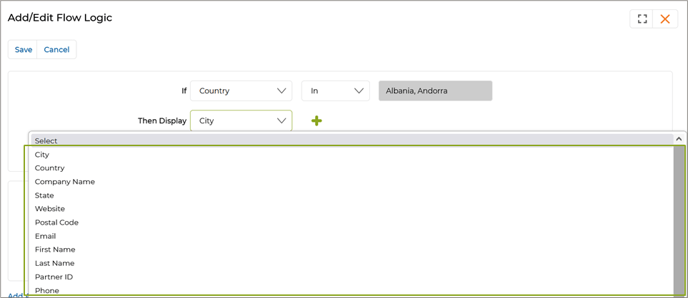
- By clicking + we can add more dropdown lists to select multiple values.
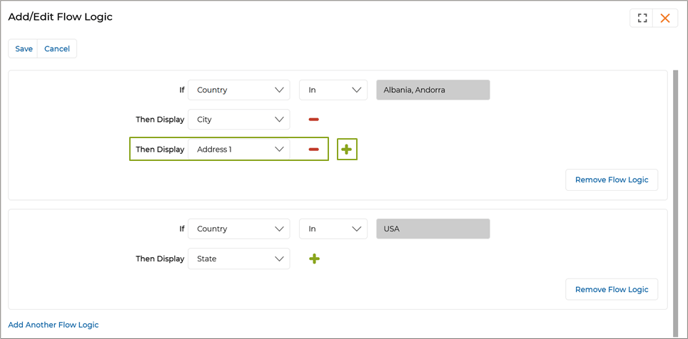
- If any dropdown is not required, click – to remove it.
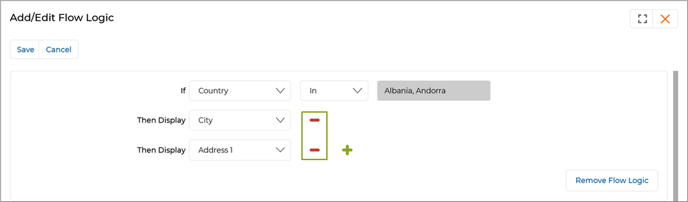
- Remove a Flow Logic by clicking “Remove Flow Logic”.
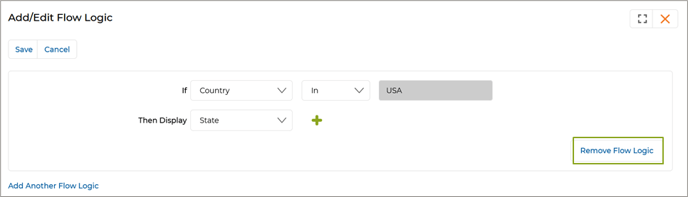
- To add a new Flow Logic, click “Add Another Flow Logic”.
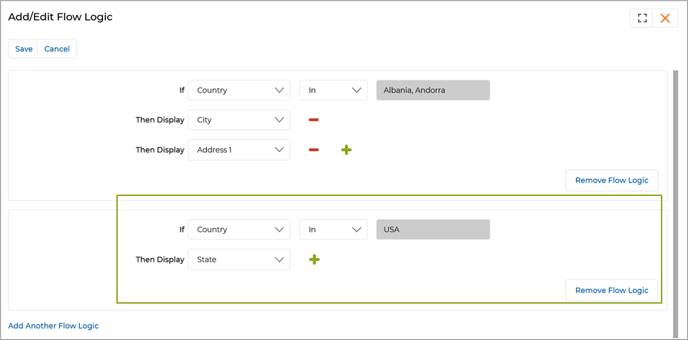
Origin of Feature
Customer request. This feature allows administrators to conditionally display or hide form fields based on multiple field values and combined Flow Logic.
CX Strategy Relation (6 S’s)
![]()
Portal User-Facing Benefits
This feature allows Admins to automatically map prospect information, such as email, company name, or partner number, to existing partner accounts, ensuring accurate validation and seamless data capture during form submissions.
______________________________________________________________________________________
“Auto Populate By” – Primary Field Mapping and Validation in Dynamic Forms
Related Application(s)
Workflow Management
Feature Description
This feature introduces a new “Auto Populate By” setting in the form configuration, allowing administrators to designate a single primary field, such as Company Name, Partner Number, or Email, for account validation during form submission. This complements existing options – Auto Populate, Read Only, and Hide. When a user fills out this tagged field, the system automatically checks for an existing account match and, if found, auto-populates other related fields like Country, State, City, and Region. This enhancement offers greater flexibility in form design across different portals, improves data accuracy, and streamlines the user experience by pre-filling known information when a match is detected.
- Navigate to Administration > Workflow > Forms and open a Dynamic Form.
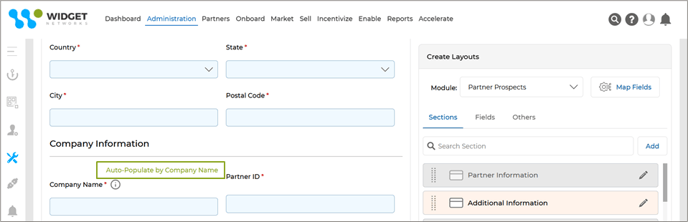
- In this example, we see that the field “Company Name” is the primary validation field.
- When a user fills this field, the system attempts to match it with an existing account.
- If a match is found, other related fields (e.g., Country, State, City) are automatically populated using account data.
- The field set as “Auto Populate By” is visually highlighted in the form for easy identification.
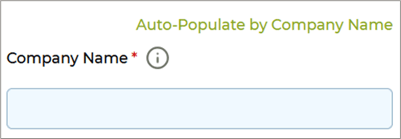
- To enable this feature on this field, we have to click the Settings icon (this icon becomes visible once we hover the mouse over the field area), which will open the Control Settings window.
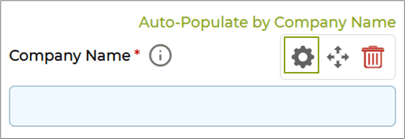
- Select “Auto-populate by” and click Save.
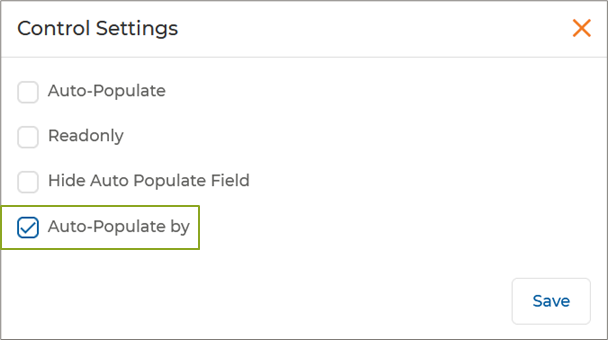
- Only one field in the form can be tagged as “Auto Populate By.” If the admin attempts to apply this setting to multiple fields, the system will trigger an alert, enforcing this constraint.
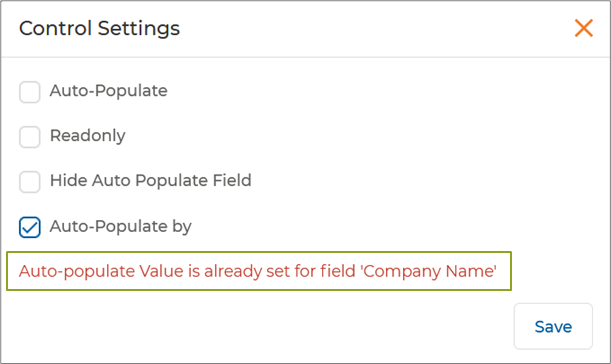
- Other fields can still be configured independently (e.g., hidden or auto-populated).
Origin of Feature
Customer request. This feature enables administrators to define a primary field using the new “Auto Populate By” setting, allowing for the automatic population of related form fields when a matching record is identified.
CX Strategy Relation (6 S’s)
![]()
Portal User-Facing Benefits
This feature introduces the “Auto Populate By” setting, allowing Admins to designate a primary field for account validation and auto-fill related fields during form submission.
______________________________________________________________________________________
Enhanced Search & Filter Functionality
Related Application(s)
Partner Profile Management
Feature Description
The updated Filter functionality streamlines the user experience by integrating the previously separate "Search" and "Clear Search" buttons into a unified interface. Users can now access both Basic and Advanced search options via the Filter button, where only predefined filterable fields (like "Badge Name") are displayed. Once a filter is applied, results are dynamically updated on the page, and a contextual clear (×) icon appears to reset the search; this icon remains hidden when no filter is active. The advanced search behavior remains unchanged, ensuring familiarity for users while improving overall usability with a cleaner, more efficient design.
- Navigate to Partners > Partners > Badges to access the View Badges page.
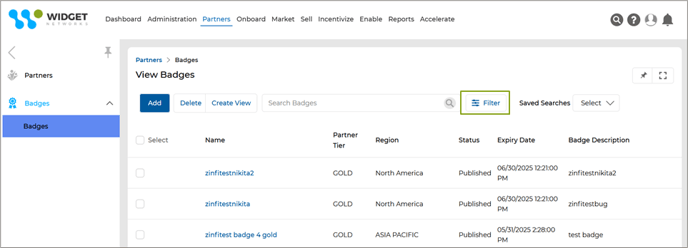
- Click the Filter button to open the Search panel, which includes both Basic and Advanced search options.
- In the Basic tab, users can apply filters using predefined fields. For example, you can filter the Badge Name column using the Contains operator with the keyword "gold". Other available operators include Equals, Begins With, Ends With, Not Equal, etc.
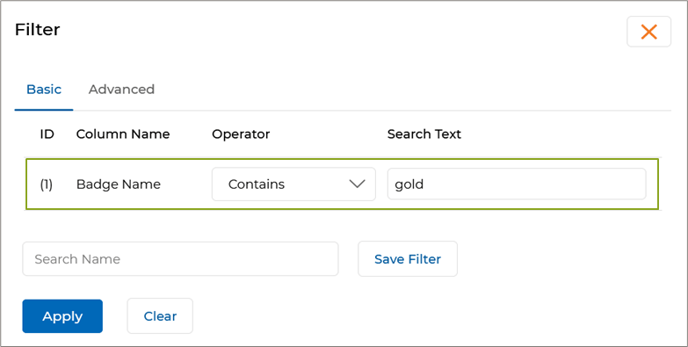
- Switching to the Advanced tab opens the Advanced Filter window, enabling users to define more granular filtering criteria.
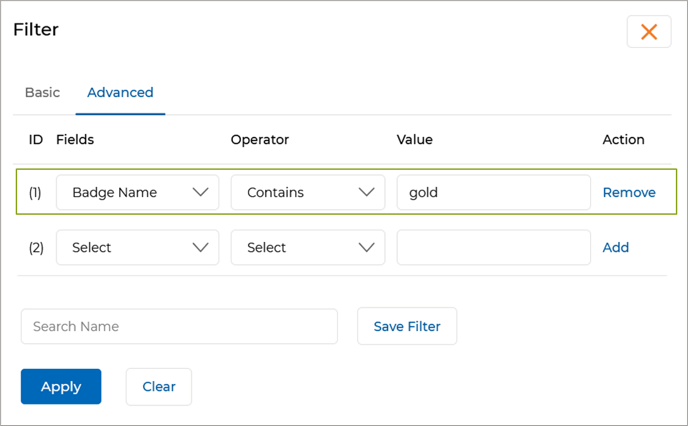
- In the Advanced Filter view, select a specific Field Name, choose the relevant Operator, and enter the desired Field Value. Click Add to include the condition in your filter set.
- Once the filter criteria are defined, the system performs an inline search and refreshes the listing with the filtered results.
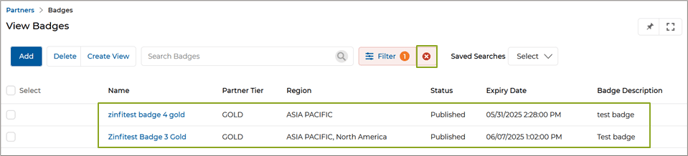
- After applying a filter, a "Clear Search" (×) icon appears next to the filter, allowing users to remove it easily.
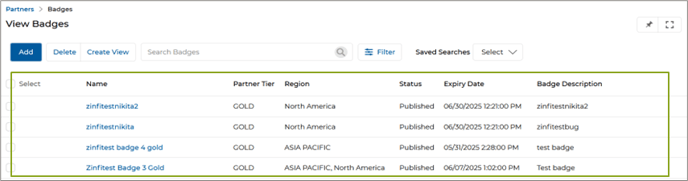
- A new Global Search bar has been introduced at the top of the listing page for quick, keyword-based lookups.

- Enter a keyword (e.g., "gold") in the global search bar and click the magnifying glass icon to instantly display matching records in the table below.

- Once a keyword is entered and the magnifying glass is clicked, matching records are instantly displayed in the table below.
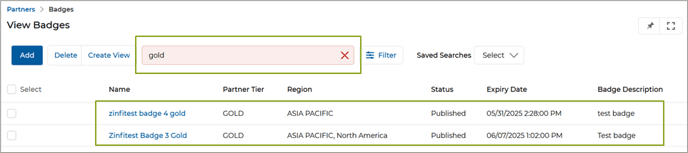
- To reset the search, click the (×) icon inside the global search field.
Origin of Feature
Customer Request. This feature improves search and filter by allowing users to apply basic or advanced filters on specific fields and use a global search bar to quickly find relevant records.
CX Strategy Relation (6 S’s)
![]()
Portal User-Facing Benefits
This feature introduces enhanced search and filter options, allowing Admins and Partners to apply basic or advanced filters on specific fields and use a global search bar to quickly locate relevant records.
______________________________________________________________________________________
Fixes and Patches
Single URL-based Reports for Multiple Personas
Related Application(s)
Business Intelligence Reports
Feature Description
This enhancement in the Reporting Engine enables a single Power BI report URL to dynamically display different report components based on user personas (e.g., Admin, Partner). Previously, separate reports and URLs were required for each persona, leading to redundancy and increased maintenance efforts. Now, the same URL adapts to show persona-specific content without requiring multiple report versions. Admins and Partners accessing the same URL will see reports tailored to their roles.
- Log in to the UPM portal as an Admin and navigate to the Report Zone by selecting Enable from the top menu.
- Click on Report Configuration > View Reports to access the Manage Reports page, which lists all reports.
- Open the Report Details page by selecting a report from the list.
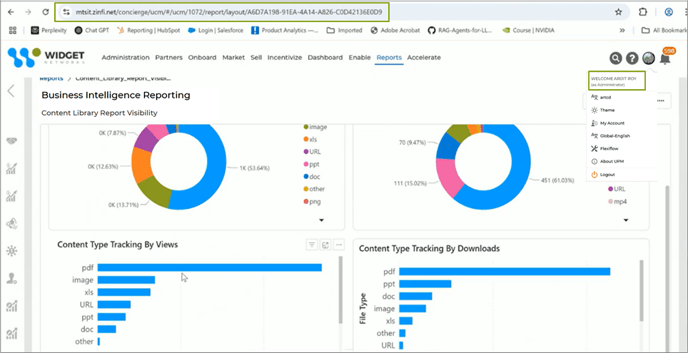
- Copy the report URL as highlighted in the interface.
- Log in to the UPM portal as a Partner, paste the copied URL into the address bar, and press Enter.
- A different report will load, demonstrating how the system dynamically adjusts the report content based on the user persona, as shown in the image below.
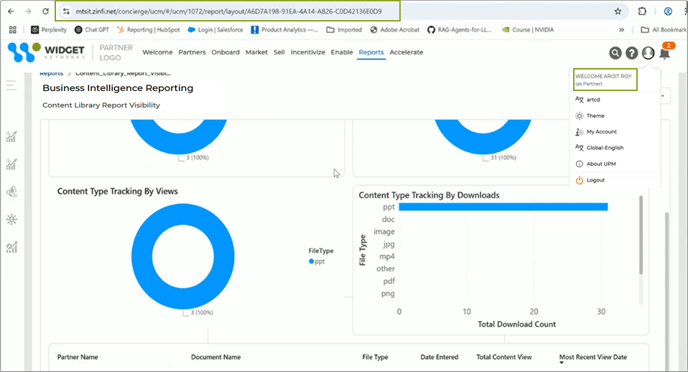
- The same report URL serves both Admins and Partners. This confirms that a single report URL can serve multiple personas, eliminating the need for separate reports while ensuring a customized user experience.
Origin of Feature
Customer request. This feature enables a single URL to dynamically display different report components based on user personas.
CX Strategy Relation (6 S’s)
![]()
Portal User-Facing Benefits
This feature allows Admins and Partners to access the same URL will see different report components based on their role.
______________________________________________________________________________________
Dedicated Download Option for Co-Branded Assets for Partners
Related Application(s)
Co-Branded Assets Management
Feature Description
This enhancement improves the co-branded asset management experience by adding a Download button directly to the listing page, allowing partners to quickly download assets without navigating to the details page. Available in both List View (as a visible button) and Card View (via the four-dot menu), this update streamlines access, saves time, and simplifies the workflow, enabling partners to manage and retrieve their co-branded assets more efficiently.
- After logging into UPM, the partner navigates to Enable > Assets > Asset Library > Assigned to You to co-brand the desired co-brandable Asset.
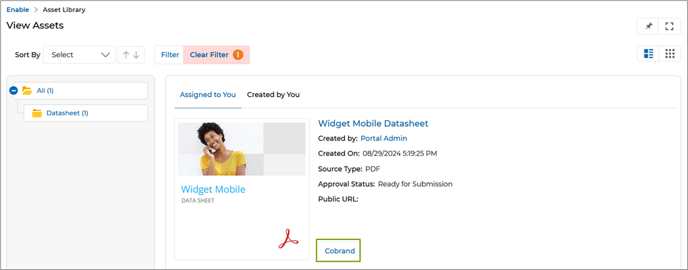
- Once the asset is co-branded, the partner navigates to the details page of the co-branded asset, where a Download button is available, allowing them to easily download the co-branded asset.
- The Download button is now available on the listing page of the co-branded asset, as well.
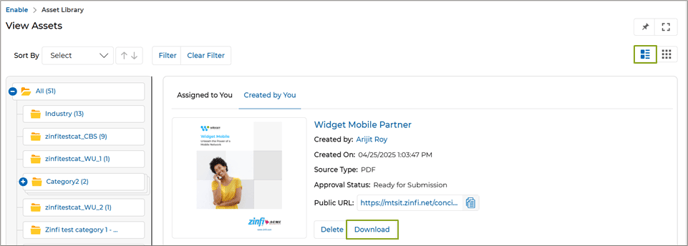
- When the View Assets page is set to List View on the listing page, each co-branded listed asset displays a Download button as shown in the above image. By clicking this button, the partner can directly download their co-branded asset.
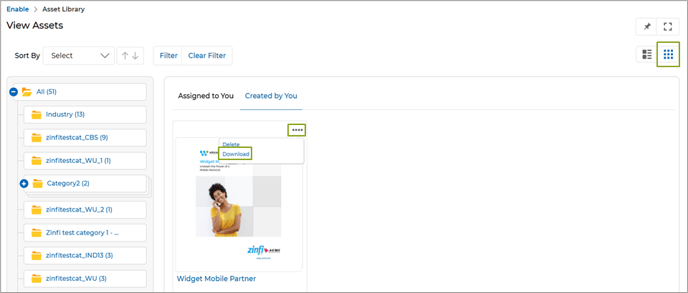
- Each asset shows a "Four dots" menu if the partner switches to Card View. Clicking on the four dots displays the download option, allowing the partner to download the co-branded asset.
Origin of Feature
Customer request. This feature provides the option to download co-branded assets.
CX Strategy Relation (6 S’s)
![]()
Portal User-Facing Benefits
This feature is for Partners to download co-branded assets.
______________________________________________________________________________________
Co-Branding Default Logo Logic - Enhancements
Related Application(s)
Co-Branded Assets Management
Feature Description
This enhancement simplifies and improves the co-branding experience by introducing a single, streamlined option – “Default Partner Logo” – under Asset settings, eliminating the previously confusing “Default OEM Logo” checkbox. Now, admins can easily control default logo behavior, which is only visible when enabled from Portal Settings, reducing UI clutter. The updated back-end logic ensures a more reliable logo detection sequence: the system prioritizes default logos uploaded in the Partner Logo module (CPA login), and if unavailable, falls back to the logo under the partner's My Account section, ensuring the most relevant logo is auto-selected. If no default is set, partners can still choose from all available logos via a clear pop-up interface. Additionally, removing the outdated "High Resolution Logo" field cleans up account settings. Overall, this update enhances clarity, reduces manual setup, and provides a smoother, more intuitive co-branding process for both admins and partners.
- Navigate to the “Created by You” section of the Assets Listings page and click the Manage Zone button of the listed Asset, which takes us to the “Asset Zones and Properties” page.
- In the “Edit Image Properties” section, only the "Default Partner Logo" checkbox remains visible in the asset settings UI. The "Default OEM Logo" checkbox has been removed.
- If the Default Partner Logo checkbox is enabled, then the system checks if a default logo is marked in the ‘Partner Logo’ application in the CPA’s login.
- If found, that logo is used as the default during co-branding.
- If not found, the system checks the ‘Partner Logo’ field in the My Account section. If a logo is present there, it is used as the default.
- If the Default Partner Logo checkbox is not enabled, during co-branding, the partner is presented with a “Select Image” option.
- Upon clicking, a pop-up window appears showing:
- All logos uploaded in the ‘Partner Logo’ application, and
- The logo under the ‘My Account’ section. The partner can then manually select the desired logo.
Origin of Feature
Customer request. This feature enhances default logo detection during co-branding by prioritizing logos from the Partner Logo application or My Account and showing all available logos when no default is set.
CX Strategy Relation (6 S’s)
![]()
Portal User-Facing Benefits
This feature allows Admins to define default co-branding logos more efficiently by applying a prioritized detection logic and removing redundant settings.
______________________________________________________________________________________
Display of UPM Field Labels for Easy Field Mappings
Related Application(s)
Connectors Management
Feature Description
In the CRM Mapper, the "UPM Attribute" column previously displayed confusing internal field names (e.g., text_01, dropdown_01) for custom fields, especially problematic in a multi-tenant environment. This made it hard for Admins, client support staff, and customers to identify and map fields correctly. With the new update, the UPM Attribute now displays the real-time field labels shown in the ZINFI UI, making CRM field mapping more intuitive, reducing errors, and eliminating the need for back-and-forth clarification or guesswork during connector setup. This new enhancement improves the user experience in the CRM Field Mapper by displaying the actual field labels in the UPM Attribute column instead of internal field codes like text_01 or dropdown_01, which were especially confusing in multi-tenant environments.
- Old Behavior:
The system showed backend field identifiers (e.g., FIRST_NAME, LAST_NAME, EMAIL1) in the UPM Attribute column.
- Post Enhancement:
The UPM Attribute column now shows the actual field label as defined in the ZINFI UI. Labels dynamically reflect updates – if a field label (e.g., “Description”) is changed in the application, the CRM Mapper will display the updated label without needing to refresh or save separately.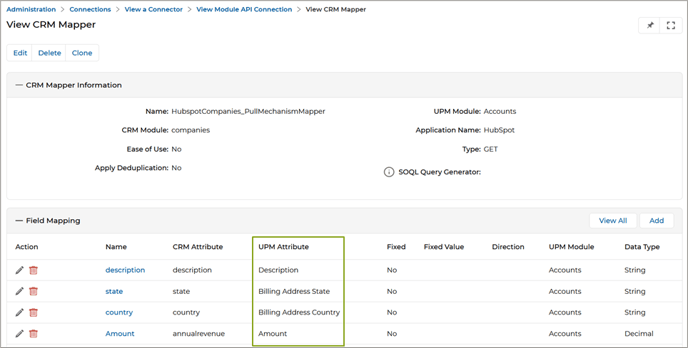
Origin of Feature
Customer request. This feature improves CRM field mapping by displaying user-friendly field labels instead of internal field names.
CX Strategy Relation (6 S’s)
![]()
Portal User-Facing Benefits
This feature lets Admins view familiar field labels instead of system-generated names in CRM mappings.
______________________________________________________________________________________
Dynamic Labels based on Training Material Progress
Related Application(s)
Partner Learning Management
Feature Description
This fix enhances user clarity by dynamically updating the section button label within a course based on the progress status of its training materials. Instead of always displaying “View Section,” the button now shows “Start” if no materials are completed, “Resume” if some are completed, and “Review” when all are finished. This real-time, context-aware labelling eliminates confusion and helps users easily understand what action to take next, improving the overall learning experience and navigation within the course structure.
- Log in to the portal as a Partner and navigate to Enable > Learning > Courses > My Enrolled Courses to view the list of enrolled courses.
- Each course consists of multiple sections. We go to the details page of a course, where all the sections related to the course will be available.
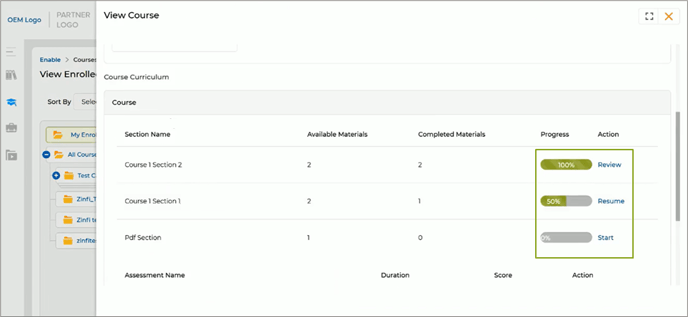
- Each section contains one or more training materials. Earlier, the button shown for each section was always labelled “View Section”, regardless of whether training materials were completed or not.
- The button label for each section now changes dynamically based on how much of the section’s content has been completed:

- The section button status updates in real time based on the logged-in user’s interaction with the training materials.
Origin of Feature
Customer request. This feature improves learning navigation by dynamically updating section button labels to "Start", "Resume", or "Review" based on training material completion.
CX Strategy Relation (6 S’s)
![]()
Portal User-Facing Benefits
This feature allows Partners to quickly understand their progress within each course section by displaying dynamic button labels - Start, Resume, or Review - based on the completion status of training materials.
______________________________________________________________________________________
Default Completion Messages (Pass/Fail) for Learning Assessment
Related Application(s)
Partner Learning Management
Feature Description
Earlier, if a partner completed an assessment and their score did not fall within any predefined score range (configured under Score Messages), the system showed a generic static message, which could sometimes be inaccurate (e.g., "Congratulations on completing the assessment successfully!!" even for a failed score).
The new fix introduces default success and failure messages that are displayed when a user’s score does not fall within any predefined score message range. By allowing admins to configure dynamic, personalized feedback, including the user’s actual score, this update eliminates confusing or inaccurate static messages and ensures that partners always receive clear, context-appropriate responses upon assessment submission. This improves user clarity, reinforces motivation, and creates a more professional and informative learning environment.
- Log in to the portal as a Partner and navigate to Enable > Learning > Assessments > View Assessments, where all the Assessments are listed.
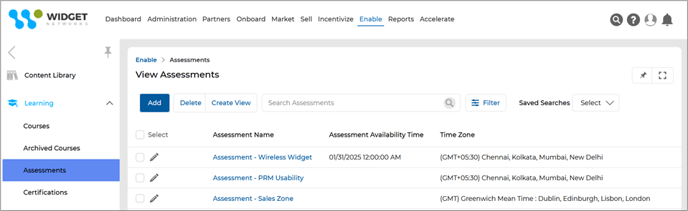
- Once we go to the details page of an Assessment, we see that two new text fields are now available in the Completion Message section.
-
- Default Success Message - Shown when the user passes the assessment
- Default Failure Message - Shown when the user fails the assessment
For example:
"Congratulations! You passed the assessment with a score of 80."
"Unfortunately, you failed the assessment with a score of 35."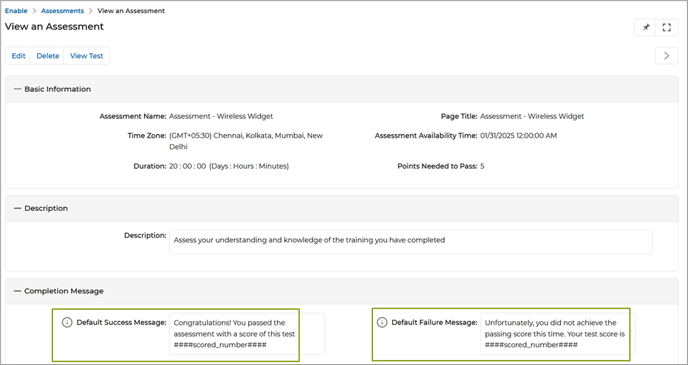
- These default messages are displayed only when:
-
- The assessment is submitted.
- The user has either passed or failed based on the pass mark.
- The Partner will see a relevant message upon completing the assessment, based on their performance.
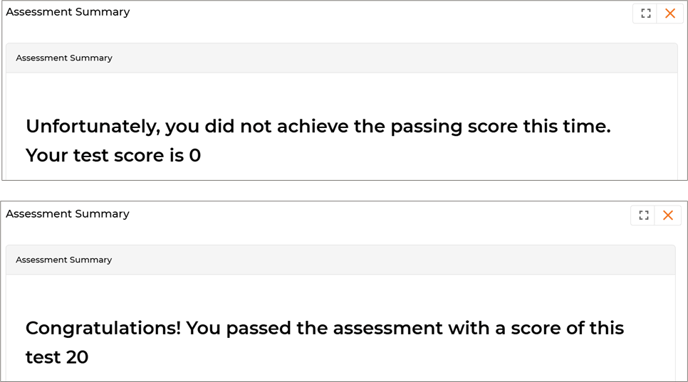
Origin of Feature
Customer request. This feature improves assessment feedback by displaying dynamic pass or fail messages.
CX Strategy Relation (6 S’s)
![]()
Portal User-Facing Benefits
This feature allows Partners to receive accurate feedback after assessment submission by displaying dynamic pass or fail messages.
______________________________________________________________________________________
CRM Mapper Enhancement - Enable Blank Field Sync to CRMs
Related Application(s)
Connectors Management
Feature Description
Previously, when ZINFI sent data to connected CRMs (e.g., Salesforce, HubSpot, Microsoft Dynamics), blank fields (e.g., a cleared phone number) were ignored and not sent, causing the CRM to retain old values. This behaviour was problematic for users who intentionally removed data (like opting out of calls) but found it still present in the CRM. With the introduction of this new feature, users now have the option to send blank values to connected CRMs via the CRM mapper. By enabling the "Send Blank Values" option, fields such as phone numbers that are intentionally cleared or left blank will be sent to the CRM, allowing it to update the record and remove the old value (e.g., phone number) from the CRM. This ensures that CRMs reflect the most up-to-date data, including any intentional removals or updates, rather than retaining outdated or incorrect information.
- To enable the feature, the user needs to visit the Add/Edit CRM Mapper Details page, and a new toggle, called "Send Blank Values," has been added to the CRM Field Mapper screen for outbound data synchronization.
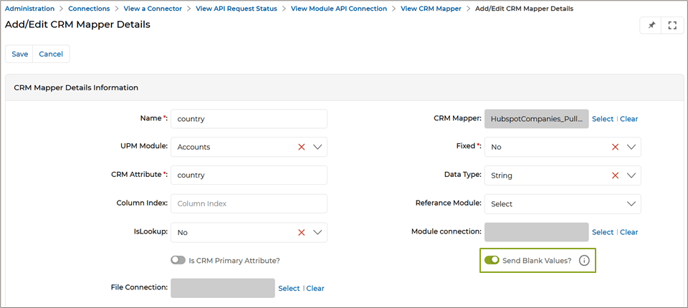
- When the "Send Blank Values" option is enabled, ZINFI will include blank values in the data sent to the CRM. This ensures that cleared or removed values (such as a phone number) are properly updated in the CRM.
- If the option is disabled, ZINFI will continue to ignore blank values during the sync process, and those fields will not be updated in the CRM.
Note: This setting only applies to Textbox and Text area fields, as these field types are commonly supported across CRMs for handling blank or null input values.
Origin of Feature
Customer request. This feature enables the sending of blank values to CRMs during data syncs to ensure accurate updates.
CX Strategy Relation (6 S’s)
![]()
Portal User-Facing Benefits
This feature lets Admins send blank values to CRMs during data syncs, ensuring accurate data removal.
______________________________________________________________________________________
Updated Verbiage in Login UI
Related Application(s)
Users Management
Feature Description
The recent update focuses on verbiage changes across the login and password-related screens, replacing “Email ID” with “Username (or email address)” to better reflect current authentication practices. Additionally, instructional text and alert messages related to username and password have been revised for greater clarity, outlining specific requirements. These updates ensure clearer communication to users, improved UI consistency, and reduced confusion, ultimately enhancing the overall user experience and accuracy.
- Previous:
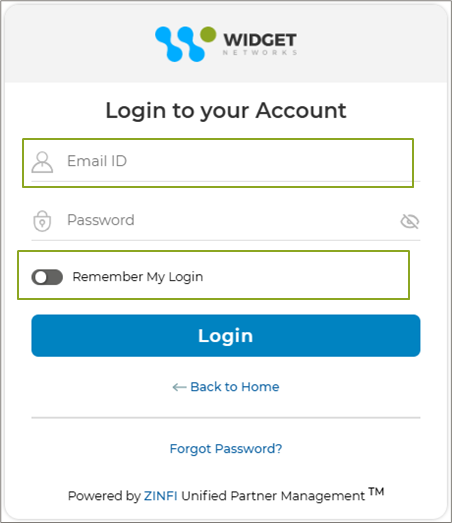
- Now:
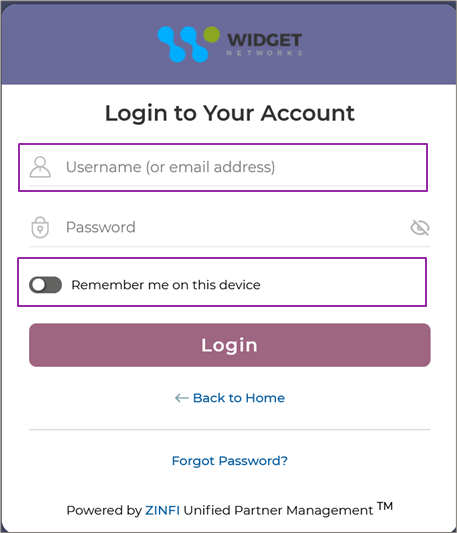
Previously, user was asked to provide “Email ID” to login. Now, user is asked to provide “Username (or email address)” to login.
- Previous:
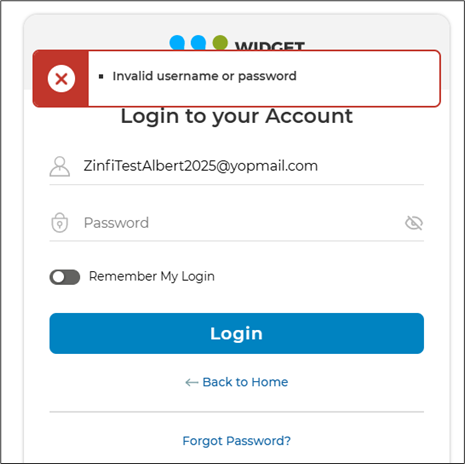
- Now:
Previously, if the wrong username was provided, the error message used to show as “Invalid username or password”. Now, the message is shown as “Invalid username or password. Please try again.”.
Origin of Feature
This feature, which was requested by the customer, improves the user experience by updating the interface verbiage to provide clearer field labels and more intuitive instructional messages.
CX Strategy Relation (6 S’s)
![]()
Portal User-Facing Benefits
This feature enhances usability for Admins and Partners by updating verbiage on login and password screens for clearer user guidance.
_____________________________________________________________________________________
|
Feature Name |
Application(s) |
CX Strategy Relation |
User Type(s) |
|
Row-Level Security (RLS) in Reports via User Roles |
Business Intelligence Reports
|
Scalability |
Admin |
|
Incentive Rules Engine Upgrades - Auto-entitlement |
Market Development Funds Management, Commissions Management, Rebates Management |
Sufficiency |
Admin |
|
Automatic Country & Language Selection based on Browser Settings |
Users & Territories Management |
Sufficiency |
Admin |
|
Records in "Pending More Info" Status – Deletion Restricted |
Deals Registration Management |
Sufficiency |
Admin, Partner |
|
Report Preview Functionality |
Business Intelligence Reports |
Sufficiency |
Admin |
|
Save Reports as PDF / Slide – PPT |
Business Intelligence Reports |
Sufficiency |
Admin, Partner |
|
Record-Attached Files Downloadable in ZIP |
Partner Leads Management |
Sufficiency |
Admin |
|
Tracking and Applying Preferred UI Country & Language |
Users & Territories Management |
Sufficiency |
Admin, Partner |
|
Display Program Type Assignment in Partner Program Sessions List Page |
Partner Programs Management |
Sufficiency |
Admin |
|
Incentive Rules Engine – Import Engine Integration |
Market Development Funds Management, Generic |
Sufficiency |
Admin |
|
MDF Report Updates |
Business Intelligence Reports |
Sufficiency |
Admin, Partner |
|
Enhanced Connector Log for End-to-End Data Sync Visibility |
Connectors Management |
Sufficiency |
Admin |
|
Duplicate Mapping Validation in CRM Mapper |
Connectors Management |
Sufficiency |
Admin |
|
Lead Assignment Rule Engine |
Partner Leads Management |
Sufficiency |
Admin, Partner |
|
Progress Bar in Card View and Thumb View for Enrolled Courses and Certificates |
Learning |
Sufficiency |
Partner |
|
Tooltips for CMS Editor Components |
CMS Management |
Sufficiency |
Admin |
|
Collapsable CTA button |
Workflow Management |
Sufficiency |
Admin, Partner |
|
Editing Reports Simplified |
Business Intelligence Reports |
Sufficiency |
Admin |
|
Record-Level Log History |
Workflow Management |
Sufficiency |
Admin |
|
Contracts Agreement Hub |
Partner Contracts Management |
Sufficiency |
Admin, Partner |
|
Updated CAPTCHA in the Reset Password Page |
Users & Territories Management |
Security |
Admin, Partner |
|
Enhanced Password Reset Email Instructions |
Alerts & Notification Management |
Security |
Admin |
|
Prospect-to-Account Mapping in Dynamic Forms |
Workflow Management |
Scalability |
Admin |
|
Dynamic Forms - Enhanced Conditional Field Display Logic |
Workflow Management |
Scalability |
Admin |
|
“Auto Populate By” – Primary Field Mapping and Validation in Dynamic Forms |
Workflow Management |
Scalability |
Admin |
|
Enhanced Search & Filter Functionality |
Generic |
Scalability |
Admin, Partner |
|
Fixes and Patches |
|
|
|
|
Single URL-based Reports for Multiple Personas |
Business Intelligence Reports |
Scalability |
Admin, Partner |
|
Dedicated Download Option for Co-Branded Assets for Partners |
Co-branded Assets Management |
Sufficiency |
Partner |
|
Co-Branding Default Logo Logic - Enhancements |
Co-branded Assets Management |
Sufficiency |
Admin |
|
Display of UPM Field Labels for Easy Field Mappings |
Connectors Management |
Sufficiency |
Admin |
|
Dynamic Labels based on Training Material Progress |
Partner Learning Management |
Sufficiency |
Admin |
|
Default Completion Messages (Pass/Fail) for Learning Assessment |
Partner Learning Management |
Sufficiency |
Partner |
|
CRM Mapper Enhancement - Enable Blank Field Sync to CRMs |
Connectors Management |
Sufficiency |
Admin |
|
Updated Verbiage in Login UI |
Users & Territories Management |
Sufficiency |
Admin, Partner |